달력

32024  이전 다음

  • 1
  • 2
  • 3
  • 4
  • 5
  • 6
  • 7
  • 8
  • 9
  • 10
  • 11
  • 12
  • 13
  • 14
  • 15
  • 16
  • 17
  • 18
  • 19
  • 20
  • 21
  • 22
  • 23
  • 24
  • 25
  • 26
  • 27
  • 28
  • 29
  • 30
  • 31


원본 : http://www.codeproject.com/Articles/17973/How-To-Get-Hardware-Information-CPU-ID-MainBoard-I


Screenshot - Article.jpg

Introduction

For numerous reasons, you may need to access system hardware information. One example is when you have created a software and you want to put a lock on that software.

One of the most efficient ways to do so is to get one of the IDs of a piece of hardware in the target machine and then plan your software so that it can just work with the computer that has the same ID. Since some hardware IDs (and not all of them) are unique, you have very simply created a lock!

Notice

In the first versions of this article, I thought that the Processor ID was unique, but some other users told me that they had tested the Processor ID in different computers and sometimes they give the same result. So you should consider this and not try to just rely on Processor ID. I suggest that you combine it with some other IDs such as Motherboard, USB Controller, Bios, CD-ROM Drive and so on.

Another example is the need to get hard disk information, its partitions, and the free space on each partition. You may also require the hardware information while working on a multimedia application when you need to have complete information about the sound device and the VGA device of the target machine. An excellent use of this application is getting information about the memory of the system and valuable information such as the device memory address, memory device and so on.

Using the Code

First of all, you have to know that the application function is using some System.Management classes. So you need to add this line of code:

using System.Management;

To get hardware information, you need to create an object of ManagementObjectSearcher class.

ManagementObjectSearcher searcher = new ManagementObjectSearcher(
    "select * from " + Key);

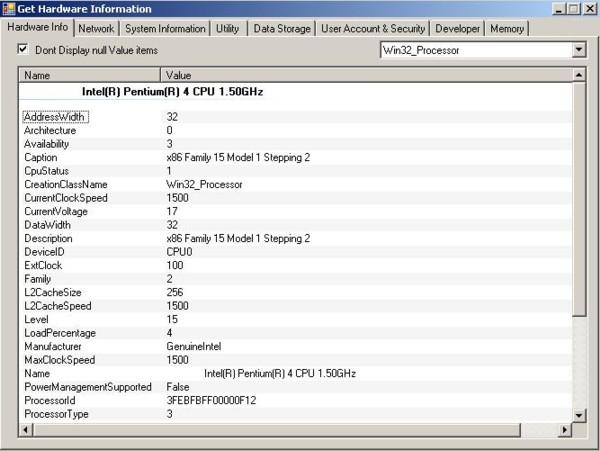
The Key on the code above, is a variable that is replaced with appropriate data. For example, to get the information of the CPU, you have to replace the Key with Win32_Processor. A complete list of these keys is given below:

Win32_1394Controller
Win32_1394ControllerDevice
Win32_Account
Win32_AccountSID
Win32_ACE
Win32_ActionCheck
Win32_AllocatedResource
Win32_ApplicationCommandLine
Win32_ApplicationService
Win32_AssociatedBattery
Win32_AssociatedProcessorMemory
Win32_BaseBoard
Win32_BaseService
Win32_Battery
Win32_Binary
Win32_BindImageAction
Win32_BIOS
Win32_BootConfiguration
Win32_Bus
Win32_CacheMemory
Win32_CDROMDrive
Win32_CheckCheck
Win32_CIMLogicalDeviceCIMDataFile
Win32_ClassicCOMApplicationClasses
Win32_ClassicCOMClass
Win32_ClassicCOMClassSetting
Win32_ClassicCOMClassSettings
Win32_ClassInfoAction
Win32_ClientApplicationSetting
Win32_CodecFile
Win32_COMApplication
Win32_COMApplicationClasses
Win32_COMApplicationSettings
Win32_COMClass
Win32_ComClassAutoEmulator
Win32_ComClassEmulator
Win32_CommandLineAccess
Win32_ComponentCategory
Win32_ComputerSystem
Win32_ComputerSystemProcessor
Win32_ComputerSystemProduct
Win32_COMSetting
Win32_Condition
Win32_CreateFolderAction
Win32_CurrentProbe
Win32_DCOMApplication
Win32_DCOMApplicationAccessAllowedSetting
Win32_DCOMApplicationLaunchAllowedSetting
Win32_DCOMApplicationSetting
Win32_DependentService
Win32_Desktop
Win32_DesktopMonitor
Win32_DeviceBus
Win32_DeviceMemoryAddress
Win32_DeviceSettings
Win32_Directory
Win32_DirectorySpecification
Win32_DiskDrive
Win32_DiskDriveToDiskPartition
Win32_DiskPartition
Win32_DisplayConfiguration
Win32_DisplayControllerConfiguration
Win32_DMAChannel
Win32_DriverVXD
Win32_DuplicateFileAction
Win32_Environment
Win32_EnvironmentSpecification
Win32_ExtensionInfoAction
Win32_Fan
Win32_FileSpecification
Win32_FloppyController
Win32_FloppyDrive
Win32_FontInfoAction
Win32_Group
Win32_GroupUser
Win32_HeatPipe
Win32_IDEController
Win32_IDEControllerDevice
Win32_ImplementedCategory
Win32_InfraredDevice
Win32_IniFileSpecification
Win32_InstalledSoftwareElement
Win32_IRQResource
Win32_Keyboard
Win32_LaunchCondition
Win32_LoadOrderGroup
Win32_LoadOrderGroupServiceDependencies
Win32_LoadOrderGroupServiceMembers
Win32_LogicalDisk
Win32_LogicalDiskRootDirectory
Win32_LogicalDiskToPartition
Win32_LogicalFileAccess
Win32_LogicalFileAuditing
Win32_LogicalFileGroup
Win32_LogicalFileOwner
Win32_LogicalFileSecuritySetting
Win32_LogicalMemoryConfiguration
Win32_LogicalProgramGroup
Win32_LogicalProgramGroupDirectory
Win32_LogicalProgramGroupItem
Win32_LogicalProgramGroupItemDataFile
Win32_LogicalShareAccess
Win32_LogicalShareAuditing
Win32_LogicalShareSecuritySetting
Win32_ManagedSystemElementResource
Win32_MemoryArray
Win32_MemoryArrayLocation
Win32_MemoryDevice
Win32_MemoryDeviceArray
Win32_MemoryDeviceLocation
Win32_MethodParameterClass
Win32_MIMEInfoAction
Win32_MotherboardDevice
Win32_MoveFileAction
Win32_MSIResource
Win32_NetworkAdapter
Win32_NetworkAdapterConfiguration
Win32_NetworkAdapterSetting
Win32_NetworkClient
Win32_NetworkConnection
Win32_NetworkLoginProfile
Win32_NetworkProtocol
Win32_NTEventlogFile
Win32_NTLogEvent
Win32_NTLogEventComputer
Win32_NTLogEventLog
Win32_NTLogEventUser
Win32_ODBCAttribute
Win32_ODBCDataSourceAttribute
Win32_ODBCDataSourceSpecification
Win32_ODBCDriverAttribute
Win32_ODBCDriverSoftwareElement
Win32_ODBCDriverSpecification
Win32_ODBCSourceAttribute
Win32_ODBCTranslatorSpecification
Win32_OnBoardDevice
Win32_OperatingSystem
Win32_OperatingSystemQFE
Win32_OSRecoveryConfiguration
Win32_PageFile
Win32_PageFileElementSetting
Win32_PageFileSetting
Win32_PageFileUsage
Win32_ParallelPort
Win32_Patch
Win32_PatchFile
Win32_PatchPackage
Win32_PCMCIAController
Win32_Perf
Win32_PerfRawData
Win32_PerfRawData_ASP_ActiveServerPages
Win32_PerfRawData_ASPNET_114322_ASPNETAppsv114322
Win32_PerfRawData_ASPNET_114322_ASPNETv114322
Win32_PerfRawData_ASPNET_ASPNET
Win32_PerfRawData_ASPNET_ASPNETApplications
Win32_PerfRawData_IAS_IASAccountingClients
Win32_PerfRawData_IAS_IASAccountingServer
Win32_PerfRawData_IAS_IASAuthenticationClients
Win32_PerfRawData_IAS_IASAuthenticationServer
Win32_PerfRawData_InetInfo_InternetInformationServicesGlobal
Win32_PerfRawData_MSDTC_DistributedTransactionCoordinator
Win32_PerfRawData_MSFTPSVC_FTPService
Win32_PerfRawData_MSSQLSERVER_SQLServerAccessMethods
Win32_PerfRawData_MSSQLSERVER_SQLServerBackupDevice
Win32_PerfRawData_MSSQLSERVER_SQLServerBufferManager
Win32_PerfRawData_MSSQLSERVER_SQLServerBufferPartition
Win32_PerfRawData_MSSQLSERVER_SQLServerCacheManager
Win32_PerfRawData_MSSQLSERVER_SQLServerDatabases
Win32_PerfRawData_MSSQLSERVER_SQLServerGeneralStatistics
Win32_PerfRawData_MSSQLSERVER_SQLServerLatches
Win32_PerfRawData_MSSQLSERVER_SQLServerLocks
Win32_PerfRawData_MSSQLSERVER_SQLServerMemoryManager
Win32_PerfRawData_MSSQLSERVER_SQLServerReplicationAgents
Win32_PerfRawData_MSSQLSERVER_SQLServerReplicationDist
Win32_PerfRawData_MSSQLSERVER_SQLServerReplicationLogreader
Win32_PerfRawData_MSSQLSERVER_SQLServerReplicationMerge
Win32_PerfRawData_MSSQLSERVER_SQLServerReplicationSnapshot
Win32_PerfRawData_MSSQLSERVER_SQLServerSQLStatistics
Win32_PerfRawData_MSSQLSERVER_SQLServerUserSettable
Win32_PerfRawData_NETFramework_NETCLRExceptions
Win32_PerfRawData_NETFramework_NETCLRInterop
Win32_PerfRawData_NETFramework_NETCLRJit
Win32_PerfRawData_NETFramework_NETCLRLoading
Win32_PerfRawData_NETFramework_NETCLRLocksAndThreads
Win32_PerfRawData_NETFramework_NETCLRMemory
Win32_PerfRawData_NETFramework_NETCLRRemoting
Win32_PerfRawData_NETFramework_NETCLRSecurity
Win32_PerfRawData_Outlook_Outlook
Win32_PerfRawData_PerfDisk_PhysicalDisk
Win32_PerfRawData_PerfNet_Browser
Win32_PerfRawData_PerfNet_Redirector
Win32_PerfRawData_PerfNet_Server
Win32_PerfRawData_PerfNet_ServerWorkQueues
Win32_PerfRawData_PerfOS_Cache
Win32_PerfRawData_PerfOS_Memory
Win32_PerfRawData_PerfOS_Objects
Win32_PerfRawData_PerfOS_PagingFile
Win32_PerfRawData_PerfOS_Processor
Win32_PerfRawData_PerfOS_System
Win32_PerfRawData_PerfProc_FullImage_Costly
Win32_PerfRawData_PerfProc_Image_Costly
Win32_PerfRawData_PerfProc_JobObject
Win32_PerfRawData_PerfProc_JobObjectDetails
Win32_PerfRawData_PerfProc_Process
Win32_PerfRawData_PerfProc_ProcessAddressSpace_Costly
Win32_PerfRawData_PerfProc_Thread
Win32_PerfRawData_PerfProc_ThreadDetails_Costly
Win32_PerfRawData_RemoteAccess_RASPort
Win32_PerfRawData_RemoteAccess_RASTotal
Win32_PerfRawData_RSVP_ACSPerRSVPService
Win32_PerfRawData_Spooler_PrintQueue
Win32_PerfRawData_TapiSrv_Telephony
Win32_PerfRawData_Tcpip_ICMP
Win32_PerfRawData_Tcpip_IP
Win32_PerfRawData_Tcpip_NBTConnection
Win32_PerfRawData_Tcpip_NetworkInterface
Win32_PerfRawData_Tcpip_TCP
Win32_PerfRawData_Tcpip_UDP
Win32_PerfRawData_W3SVC_WebService
Win32_PhysicalMemory
Win32_PhysicalMemoryArray
Win32_PhysicalMemoryLocation
Win32_PNPAllocatedResource
Win32_PnPDevice
Win32_PnPEntity
Win32_PointingDevice
Win32_PortableBattery
Win32_PortConnector
Win32_PortResource
Win32_POTSModem
Win32_POTSModemToSerialPort
Win32_PowerManagementEvent
Win32_Printer
Win32_PrinterConfiguration
Win32_PrinterController
Win32_PrinterDriverDll
Win32_PrinterSetting
Win32_PrinterShare
Win32_PrintJob
Win32_PrivilegesStatus
Win32_Process
Win32_Processor
Win32_ProcessStartup
Win32_Product
Win32_ProductCheck
Win32_ProductResource
Win32_ProductSoftwareFeatures
Win32_ProgIDSpecification
Win32_ProgramGroup
Win32_ProgramGroupContents
Win32_ProgramGroupOrItem
Win32_Property
Win32_ProtocolBinding
Win32_PublishComponentAction
Win32_QuickFixEngineering
Win32_Refrigeration
Win32_Registry
Win32_RegistryAction
Win32_RemoveFileAction
Win32_RemoveIniAction
Win32_ReserveCost
Win32_ScheduledJob
Win32_SCSIController
Win32_SCSIControllerDevice
Win32_SecurityDescriptor
Win32_SecuritySetting
Win32_SecuritySettingAccess
Win32_SecuritySettingAuditing
Win32_SecuritySettingGroup
Win32_SecuritySettingOfLogicalFile
Win32_SecuritySettingOfLogicalShare
Win32_SecuritySettingOfObject
Win32_SecuritySettingOwner
Win32_SelfRegModuleAction
Win32_SerialPort
Win32_SerialPortConfiguration
Win32_SerialPortSetting
Win32_Service
Win32_ServiceControl
Win32_ServiceSpecification
Win32_ServiceSpecificationService
Win32_SettingCheck
Win32_Share
Win32_ShareToDirectory
Win32_ShortcutAction
Win32_ShortcutFile
Win32_ShortcutSAP
Win32_SID
Win32_SMBIOSMemory
Win32_SoftwareElement
Win32_SoftwareElementAction
Win32_SoftwareElementCheck
Win32_SoftwareElementCondition
Win32_SoftwareElementResource
Win32_SoftwareFeature
Win32_SoftwareFeatureAction
Win32_SoftwareFeatureCheck
Win32_SoftwareFeatureParent
Win32_SoftwareFeatureSoftwareElements
Win32_SoundDevice
Win32_StartupCommand
Win32_SubDirectory
Win32_SystemAccount
Win32_SystemBIOS
Win32_SystemBootConfiguration
Win32_SystemDesktop
Win32_SystemDevices
Win32_SystemDriver
Win32_SystemDriverPNPEntity
Win32_SystemEnclosure
Win32_SystemLoadOrderGroups
Win32_SystemLogicalMemoryConfiguration
Win32_SystemMemoryResource
Win32_SystemNetworkConnections
Win32_SystemOperatingSystem
Win32_SystemPartitions
Win32_SystemProcesses
Win32_SystemProgramGroups
Win32_SystemResources
Win32_SystemServices
Win32_SystemSetting
Win32_SystemSlot
Win32_SystemSystemDriver
Win32_SystemTimeZone
Win32_SystemUsers
Win32_TapeDrive
Win32_TemperatureProbe
Win32_Thread
Win32_TimeZone
Win32_Trustee
Win32_TypeLibraryAction
Win32_UninterruptiblePowerSupply
Win32_USBController
Win32_USBControllerDevice
Win32_UserAccount
Win32_UserDesktop
Win32_VideoConfiguration
Win32_VideoController
Win32_VideoSettings
Win32_VoltageProbe
Win32_WMIElementSetting
Win32_WMISetting

First, call the Get() method of the ManagementObjectSearcher object that this application calls the searcher object. This will fill the object with the information you need. After that, you need to process the data that is in the searcher object.

foreach (ManagementObject share in searcher.Get())
{
// Some Codes ...

}

Each ManagementObject has some Properties that are useful for us. Of course the Data of those properties is needed and we can process them like this:

foreach (PropertyData PC in share.Properties)
{
 //some codes ...

}

The other parts of this application are nothing but working with the ListView control and that is really easy!

License

This article, along with any associated source code and files, is licensed under The GNU General Public License (GPLv3)

'.NET > C#' 카테고리의 다른 글

[C#] Network Driver Check  (0) 2011.08.11
[펌] Design Pattern --> C# @.@;  (0) 2009.12.24
[펌] System.Xml. XmlSerializer Examples  (0) 2009.08.31
ADHelper - An Active Directory Class  (0) 2009.08.17
C# - Dynamically Invoke Web Service At Runtime  (0) 2009.08.13
Posted by tornado
|

[C#] Network Driver Check

.NET/C# 2011. 8. 11. 10:49
[link] http://www.publicjoe.f9.co.uk/csharp/snip/snip010.html


C# Snippets


  1. How do I retreive the total space and free space for network drives?

  1. Here is how to get the free space of a networked drive using System.Management and WMI. It's important to note that the free space could be incorrect when user-quotas are applied.

using System;
using System.Management;

namespace snip010
{
  class NetworkSpace
  {
    static void Main(string[] args)
    {
      SelectQuery query = new SelectQuery(
          "select name, 
          FreeSpace from win32_logicaldisk where drivetype=4");

      ManagementObjectSearcher searcher = 
          new ManagementObjectSearcher(query);

      foreach (ManagementObject mo in searcher.Get())
      {
        Console.WriteLine("Drive letter is: {0}", mo["name"]);
        Console.WriteLine("Drive's free space is: {0}", 
                          mo["FreeSpace"]);
      }

      // Here to stop app from closing
      Console.WriteLine("\nPress Return to exit.");
      Console.Read();
    }
  }
}

I have created a little application to demo in C# Express.

A similar application to get the space on C: drive can be found here.

Note... In order to use the System.Management namespace in .NET 2, you will need to add a reference to the System.Management.dll. This can be done in C# Express by right-clicking on the project in the solution explorer and choosing Add Reference... from the list. The dll is on the first tab towards the end of the list of items.


References

For more information on the SelectQuery class visit MSDN at microsoft here.

For more information on the System.Management Namespace visit MSDN at microsoft here.

For more information on the ManagementObject class visit MSDN at microsoft here.

For more information on the ManagementObjectSearcher class visit MSDN at microsoft here.

For more information on the Win32_LogicalDisk class visit MSDN at microsoft here.

Back to Snippets.


Posted by tornado
|

cmd 창에서

subst L: c:\windows\assembly

하고 L 드라이브로 이동하면 보임.

Posted by tornado
|
새로운 뷰 엔진..


[link] http://weblogs.asp.net/scottgu/archive/2010/07/02/introducing-razor.aspx


Introducing “Razor” – a new view engine for ASP.NET

One of the things my team has been working on has been a new view engine option for ASP.NET.

ASP.NET MVC has always supported the concept of “view engines” – which are the pluggable modules that implement different template syntax options.  The “default” view engine for ASP.NET MVC today uses the same .aspx/.ascx/.master file templates as ASP.NET Web Forms.  Other popular ASP.NET MVC view engines used today include Spark and NHaml.

The new view-engine option we’ve been working on is optimized around HTML generation using a code-focused templating approach. The codename for this new view engine is “Razor”, and we’ll be shipping the first public beta of it shortly.

Design Goals

We had several design goals in mind as we prototyped and evaluated “Razor”:

  • Compact, Expressive, and Fluid: Razor minimizes the number of characters and keystrokes required in a file, and enables a fast, fluid coding workflow. Unlike most template syntaxes, you do not need to interrupt your coding to explicitly denote server blocks within your HTML. The parser is smart enough to infer this from your code. This enables a really compact and expressive syntax which is clean, fast and fun to type.

  • Easy to Learn: Razor is easy to learn and enables you to quickly be productive with a minimum of concepts. You use all your existing language and HTML skills.

  • Is not a new language: We consciously chose not to create a new imperative language with Razor. Instead we wanted to enable developers to use their existing C#/VB (or other) language skills with Razor, and deliver a template markup syntax that enables an awesome HTML construction workflow with your language of choice.

  • Works with any Text Editor: Razor doesn’t require a specific tool and enables you to be productive in any plain old text editor (notepad works great).

  • Has great Intellisense: While Razor has been designed to not require a specific tool or code editor, it will have awesome statement completion support within Visual Studio. We’ll be updating Visual Studio 2010 and Visual Web Developer 2010 to have full editor intellisense for it.

  • Unit Testable: The new view engine implementation will support the ability to unit test views (without requiring a controller or web-server, and can be hosted in any unit test project – no special app-domain required).

We’ve spent the last few months building applications with it and doing lots of usability studies of it with a variety of volunteers (including several groups of non-.NET web developers). The feedback so far from people using it has been really great.

Choice and Flexibility

One of the best things about ASP.NET is that most things in it are pluggable. If you find something doesn’t work the way you want it to, you can swap it out for something else.

The next release of ASP.NET MVC will include a new “Add->View” dialog that makes it easy for you to choose the syntax you want to use when you create a new view template file.  It will allow you to easily select any of of the available view engines you have installed on your machine – giving you the choice to use whichever view approach feels most natural to you:

AddView9

Razor will be one of the view engine options we ship built-into ASP.NET MVC.  All view helper methods and programming model features will be available with both Razor and the .ASPX view engine. 

You’ll also be able to mix and match view templates written using multiple view-engines within a single application or site.  For example, you could write some views using .aspx files, some with .cshtml or .vbhtml files (the file-extensions for Razor files – C# and VB respectively), and some with Spark or NHaml.  You can also have a view template using one view-engine use a partial view template written in another.  You’ll have full choice and flexibility.

Hello World Sample with Razor

Razor enables you to start with static HTML (or any textual content) and then make it dynamic by adding server code to it.  One of the core design goals behind Razor is to make this coding process fluid, and to enable you to quickly integrate server code into your HTML markup with a minimum of keystrokes.

To see a quick example of this let’s create a simple “hello world” sample that outputs a message like so:

image

Building it with .ASPX Code Nuggets

If we were to build the above “hello world” sample using ASP.NET’s existing .ASPX markup syntax, we might write it using <%= %> blocks to indicate “code nuggets” within our HTML markup like so:

image

One observation to make about this “hello world” sample is that each code nugget block requires 5 characters (<%= %>) to denote the start and stop of the code sequence.  Some of these characters (in particular the % key – which is center top on most keyboards) aren’t the easiest to touch-type.

Building it with Razor Syntax

You denote the start of a code block with Razor using a @ character.  Unlike <% %> code nuggets, Razor does not require you to explicitly close the code-block:

image

The Razor parser has semantic knowledge of C#/VB code used within code-blocks – which is why we didn’t need to explicitly close the code blocks above.  Razor was able to identify the above statements as self-contained code blocks, and implicitly closed them for us.

Even in this trivial “hello world” example we’ve managed to save ourselves 12 keystrokes over what we had to type before.  The @ character is also easier to reach on the keyboard than the % character which makes it faster and more fluid to type. 

Loops and Nested HTML Sample

Let’s look at another simple scenario where we want to list some products (and the price of each product beside it):

image

Building it with .ASPX Code Nuggets

If we were to implement this using ASP.NET’s existing .ASPX markup syntax, we might write the below code to dynamically generate a <ul> list with <li> items for each product inside it:

image 

Building it with Razor Syntax

Below is how to generate the equivalent output using Razor:

image

Notice above how we started a “foreach” loop using the @ symbol, and then contained a line of HTML content with code blocks within it.  Because the Razor parser understands the C# semantics in our code block, it was able to determine that the <li> content should be contained within the foreach and treated like content that should be looped.  It also recognized that the trailing } terminated the foreach statement.

Razor was also smart enough to identify the @p.Name and @p.Price statements within the <li> element as server code – and execute them each time through the loop. Notice how Razor was smart enough to automatically close the @p.Name and @p.Price code blocks by inferring how the HTML and code is being used together.

The ability to code like this without having to add lots of open/close markers throughout your templates ends up making the whole coding process really fluid and fast.

If-Blocks and Multi-line Statements

Below are a few examples of other common scenarios:

If Statements

Like our foreach example above, you can embed content within if statements (or any other C# or VB language construct), without having to be explicit about the code block’s begin/end.  For example:

image

Multi-line Statements

You can denote multiple lines of code by wrapping it within a @{ code } block like so:

image 

Notice above how variables can span multiple server code blocks – the “message” variable defined within the multi-line @{ } block, for example, is also being used within the @message code block.  This is conceptually the same as the <% %> and <%= %> syntax within .aspx markup files.

Multi-Token Statements

The @( ) syntax enables a code block to have multiple tokens.  For example, we could re-write the above code to concatenate a string and the number together within a @( code ) block:

image 

Integrating Content and Code

The Razor parser has a lot of language smarts built-into it – enabling you to rely on it to do the heavily lifting, as opposed to you having to explicitly do it yourself. 

Does it break with email addresses and other usages of @ in HTML?

Razor’s language parser is clever enough in most cases to infer whether a @ character within a template is being used for code or static content.  For example, below I’m using a @ character as part of an email address:

image

When parsing a file, Razor examines the content on the right-hand side of any @ character and attempts to determine whether it is C# code (if it is a CSHTML file) or VB code (if it is a VBHTML file) or whether it is just static content.  The above code will output the following HTML (where the email address is output as static content and the @DateTime.Now is evaluated as code:

image

In cases where the content is valid as code as well (and you want to treat it as content), you can explicitly escape out @ characters by typing @@.

Identifying Nested Content

When nesting HTML content within an if/else, foreach or other block statement, you should look to wrap the inner content within an HTML or XML element to better identify that it is the beginning of a content block.

For example, below I’ve wrapped a multi-line content block (which includes a code-nugget) with a <span> element:

image

This will render the below content to the client – note that it includes the <span> tag:

image

You can optionally wrap nested content with a <text> block for cases where you have content that you want to render to the client without a wrapping tag:

image

The above code will render the below content to the client – note that it does not include any wrapping tag:

image 

HTML Encoding

By default content emitted using a @ block is automatically HTML encoded to better protect against XSS attack scenarios.

Layout/MasterPage Scenarios – The Basics

It is important to have a consistent look and feel across all of the pages within your web-site/application.  ASP.NET 2.0 introduced the concept of “master pages” which helps enable this when using .aspx based pages or templates.  Razor also supports this concept using “layout pages” – which allow you to define a common site template, and then inherit its look and feel across all the views/pages on your site.

Simple Layout Example

Below is a simple example of a layout page – which we’ll save in a file called “SiteLayout.cshtml”.  It can contain any static HTML content we want to include in it, as well as dynamic server code.  We’ll then add a call to the “RenderBody()” helper method at the location in the template where we want to “fill in” specific body content for a requested URL:

image

We can then create a view template called “Home.cshtml” that contains only the content/code necessary to construct the specific body of a requested page, and which relies on the layout template for its outer content:

image

Notice above how we are explicitly setting the “LayoutPage” property in code within our Home.cshtml file.  This indicates that we want to use the SiteLayout.cshtml template as the layout for this view.  We could alternatively indicate the layout file we want to use within a ASP.NET MVC Controller invoking Home.cshtml as a view template, or by configuring it as the default layout to use for our site (in which case we can specify it in one file in our project and have all view templates pick it up automatically).

When we render Home.cshtml as a view-template, it will combine the content from the layout and sub-page and send the following content to the client:

image

Compact, Clean, Expressive Code

One of the things to notice in the code above is that the syntax for defining layouts and using them from views/pages is clean and minimal.  The code screen-shots above of the SiteLayout.cshtml and Home.cshtml files contain literally all of the content in the two .cshtml files – there is no extra configuration or additional tags, no <%@ Page%> prefix, nor any other markup or properties that need to be set.

We are trying to keep the code you write compact, easy and fluid.  We also want to enable anyone with a text editor to be able to open, edit and easily tweak/customize them.  No code generation or intellisense required.

Layout/MasterPage Scenarios – Adding Section Overrides

Layout pages optionally support the ability to define different “sections” within them that view templates based on the layout can then override and “fill-in” with custom content.  This enables you to easily override/fill-in discontinuous content regions within a layout page, and provides you with a lot of layout flexibility for your site.

For example, we could return to our SiteLayout.cshtml file and define two sections within our layout that the view templates within our site can optionally choose to fill-in.  We’ll name these sections “menu” and “footer” – and indicate that they are optional (and not required) within our site by passing an optional=true parameter to the RenderSection() helper call (we are doing this using the new C# optional parameter syntax that I’ve previously blogged about).

image

Because these two sections are marked as “optional”, I’m not required to define them within my Home.cshtml file.  My site will continue to work fine if they aren’t there. 

Let’s go back into Home.cshtml, though, and define a custom Menu and Footer section for them.  The below screenshot contains all of the content in Home.cshtml – there is nothing else required in the file.  Note: I moved setting the LayoutPage to be a site wide setting – which is why it is no longer there.

image

Our custom “menu” and “footer” section overrides are being defined within named @section { } blocks within the file.  We chose not to require you to wrap the “main/body” content within a section and instead to just keep it inline (which both saves keystrokes and enables you to easily add sections to your layout pages without having to go back through all your existing pages changing their syntax). 

When we render Home.cshtml as a view-template again, it will now combine the content from the layout and sub-page, integrating the two new custom section overrides in it, and send down the following content to the client:

image

Encapsulation and Re-Use with HTML Helpers

We’ve covered how to maintain a consistent site-wide look and feel using layout pages.  Let’s now look at how we can also create re-usable “HTML helpers” that enable us to cleanly encapsulate HTML generation functionality into libraries that we can re-use across our site – or even across multiple different sites.

Code Based HTML Helpers

ASP.NET MVC today has the concept of “HTML Helpers” – which are methods that can be invoked within code-blocks, and which encapsulate generating HTML.  These are implemented using pure code today (typically as extension methods).  All of the existing HTML extension methods built with ASP.NET MVC (both ones we’ve built and ones built by others) will work using the “Razor” view engine (no code changes required):

image

Declarative HTML Helpers

Generating HTML output using a code-only class approach works – but is not ideal.

One of the features we are looking to enable with Razor is an easy way to create re-usable HTML helpers using a more declarative approach.  Our plan is to enable you to define reusable helpers using a @helper { } declarative syntax like below. 

image

You’ll be able to place .cshtml files that contain these helpers into a Views\Helpers directory and then re-use them from any view or page in your site (no extra steps required):

image

Note above how our ProductListing() helper is able to define arguments and parameters.  This enables you to pass any parameters you want to them (and take full advantage of existing languages features like optional parameters, nullable types, generics, etc).  You’ll also get debugging support for them within Visual Studio.

Note: The @helper syntax won’t be in the first beta of Razor – but is something we hope will be enabled with the next drop.  Code-based helpers will work with the first beta.

Passing Inline Templates as Parameters

One other useful (and extremely powerful) feature we are enabling with Razor is the ability to pass “inline template” parameters to helper methods.  These “inline templates” can contain both HTML and code, and can be invoked on-demand by helper methods.

Below is an example of this feature in action using a “Grid” HTML Helper that renders a DataGrid to the client:

image

The Grid.Render() method call above is C#.  We are using the new C# named parameter syntax to pass strongly-typed arguments to the Grid.Render method - which means we get full statement completion/intellisense and compile-time checking for the above syntax.

The “format” parameter we are passing when defining columns is an “inline template” – which contains both custom html and code, and which we can use to customize the format of the data.  What is powerful about this is that the Grid helper can invoke our inline template as a delegate method, and invoke it as needed and as many times as it wants. In the scenario above it will call it each time it renders a row in the grid – and pass in the “item” that our template can use to display the appropriate response.

This capability will enable much richer HTML helper methods to be developed.  You’ll be able to implement them using both a code approach (like the way you build extension methods today) as well as using the declarative @helper {} approach.

Visual Studio Support

As I mentioned earlier, one of our goals with Razor is to minimize typing, and enable it to be easily edited with nothing more than a basic text editor (notepad works great).  We’ve kept the syntax clean, compact and simple to help enable that.

We have also designed Razor so that you get a rich code editing experience within Visual Studio.  We will provide full HTML, JavaScript and C#/VB code intellisense within Razor based files:

image

Notice above how we are providing intellisense for a Product object on the “@p.” code embedded within the <li> element inside a foreach loop.  Also notice how our \Views folder within the Solution Explorer contains both .aspx and .cshtml view templates.  You can use multiple view engines within a single application – making it easy to choose whichever syntax feels best to you.

Summary

We think “Razor” provides a great new view-engine option that is streamlined for code-focused templating.  It a coding workflow that is fast, expressive and fun.  It’s syntax is compact and reduces typing – while at the same time improving the overall readability of your markup and code.  It will be shipping as a built-in view engine with the next release of ASP.NET MVC.  You can also drop standalone .cshtml/.vbhtml files into your application and run them as single-pages – which also enables you to take advantage of it within ASP.NET Web Forms applications as well.

The feedback from developers who have been trying it out the last few months has been extremely positive.  We are going to be shipping the first public beta of it shortly, and are looking forward to your feedback on it.

Hope this helps,

Scott

P.S. In addition to blogging, I am also now using Twitter for quick updates and to share links. Follow me at: twitter.com/scottgu

Published Friday, July 02, 2010 11:01 PM by ScottGu
Filed under: , , ,
Posted by tornado
|


[출처] http://msdn.microsoft.com/library/ee787088.aspx


.NET Framework 4
가비지 수집 기본 사항
이 콘텐츠는 높은 품질 표준에 맞게 수작업으로 번역된 것입니다.이 페이지와 원본 영어 콘텐츠를 동시에 보려면 "기본 설정"을 클릭하고 클래식을 보기 기본 설정으로 선택합니다.

CLR(공용 언어 런타임)에서 가비지 수집은 자동 메모리 관리자 역할을 합니다.가비지 수집은 다음과 같은 이점을 제공합니다.

  • 응용 프로그램을 개발할 때 메모리를 해제할 필요가 없습니다.

  • 관리되는 힙에 효율적으로 개체를 할당합니다.

  • 더 이상 사용되지 않는 개체를 회수하고 이러한 개체의 메모리를 비워 이후 할당에서 이 메모리를 사용할 수 있도록 합니다.관리되는 개체는 자동으로 시작을 위한 정리된 콘텐츠를 받으므로 개체의 생성자가 모든 데이터 필드를 초기화할 필요가 없습니다.

  • 개체에서 다른 개체의 콘텐츠를 사용할 수 없도록 하여 메모리 안전을 제공합니다.

이 항목에는 다음과 같은 단원이 포함되어 있습니다.

가비지 수집 조건

가비지 수집은 다음 조건 중 하나가 충족될 경우 발생합니다.

  • 시스템의 실제 메모리가 부족합니다.

  • 관리되는 힙의 할당된 개체에 사용되는 메모리가 허용되는 임계값을 초과합니다.이는 관리되는 힙에서 허용되는 메모리 사용량 임계값이 초과되었음을 의미합니다.이 임계값은 프로세스가 실행됨에 따라 계속 조정됩니다.

  • GC.Collect 메서드가 호출됩니다.가비지 수집기가 지속적으로 실행되므로 이 메서드를 호출해야 하는 경우는 거의 없습니다.이 메서드는 주로 특이한 상황 및 테스트에 사용됩니다.

맨 위로 이동

관리되는 힙

CLR에 의해 초기화되고 나면 가비지 수집기는 개체를 저장 및 관리하기 위해 메모리 세그먼트를 할당합니다.이 메모리를 관리되는 힙이라고 하며, 이는 운영 체제의 네이티브 힙과 대조됩니다.

관리되는 각 프로세스마다 관리되는 힙이 있습니다.프로세스의 모든 스레드는 같은 힙에 개체를 할당합니다.

메모리를 예약하기 위해 가비지 수집기는 Win32 VirtualAlloc 함수를 호출하며 관리되는 응용 프로그램을 위해 한 번에 하나의 메모리 세그먼트를 예약합니다.또한 가비지 수집기는 필요에 따라 세그먼트를 예약하고 Win32 VirtualFree 함수를 호출하여 세그먼트를 해제해 운영 체제로 돌려보냅니다(세그먼트에서 개체를 지운 후).

힙에 할당되는 개체의 수가 적을수록 가비지 수집기가 할 일도 줄어듭니다.개체를 할당할 때는 15바이트만 필요한 상황에서 32바이트 배열을 할당하는 것처럼 필요 이상의 값을 사용하지 마십시오.

가비지 수집이 트리거되면 가비지 수집기는 비활성 개체에 의해 점유된 메모리를 회수합니다.회수 프로세스는 활성 개체를 압축하여 함께 이동하도록 하며, 비활성 공간이 제거되어 힙의 크기가 더 작아집니다.이로써 함께 할당된 개체가 관리되는 힙에서 함께 유지되어 집약성을 계속 유지합니다.

가비지 수집의 개입 수준(빈도와 지속 시간)은 할당 규모 및 관리되는 힙에서 남은 메모리의 크기에 따라 결정됩니다.

힙은 두 힙(대형 개체 힙과 소형 개체 힙)의 누적으로 간주할 수 있습니다.

대형 개체 힙에는 85,000바이트 이상의 개체가 포함됩니다.대형 개체 힙의 대형 개체는 일반적으로 배열입니다.인스턴스 개체의 크기가 상당히 커지는 경우는 거의 없습니다.

맨 위로 이동

세대

힙은 수명이 긴 개체와 짧은 개체를 처리할 수 있도록 세대로 구성됩니다.가비지 수집은 주로 힙에서 작은 부분만 점유하는 수명이 짧은 개체의 회수와 함께 발생합니다.힙에는 세 가지 개체 세대가 있습니다.

  • 0세대

    가장 젊은 세대이며 수명이 짧은 개체를 포함합니다.수명이 짧은 개체의 예로는 임시 변수가 있습니다.가비지 수집은 이 세대에서 가장 자주 발생합니다.

    새로 할당된 개체는 새로운 개체 세대를 형성하며 대형 개체가 아닌 한 암시적으로 0세대입니다. 대형 개체인 경우 2세대 수집의 대형 개체 힙으로 이동합니다.

    대부분의 개체는 0세대 가비지 수집에서 회수되며 다음 세대까지 남아 있지 않습니다.

  • 1세대

    이 세대는 수명이 짧은 개체를 포함하며 수명이 짧은 개체와 수명이 긴 개체 사이에서 버퍼 역할을 합니다.

  • 2세대

    이 세대는 수명이 긴 개체를 포함합니다.수명이 긴 개체의 예로는 프로세스의 기간 동안 유지되는 정적 데이터가 포함된 서버 응용 프로그램의 개체가 있습니다.

가비지 수집은 조건이 충족될 때 특정 세대에서 발생합니다.하나의 세대를 수집한다는 것은 해당 세대와 그보다 더 젊은 모든 세대의 개체를 수집한다는 것을 의미합니다.2세대 가비지 수집은 모든 세대의 모든 개체(즉, 관리되는 힙의 모든 개체)를 회수하므로 전체 가비지 수집이라고도 합니다.

유지 및 승격

가비지 수집에서 회수되지 않는 개체는 남은 개체라고 하며 다음 세대로 승격됩니다.0세대 가비지 수집에서 남은 개체는 1세대로 승격되고, 1세대 가비지 수집에서 남은 개체는 2세대로 승격되며, 2세대 가비지 수집에서 남은 개체는 2세대에 그대로 있습니다.

가비지 수집기는 한 세대의 잔존율이 높음을 탐지하면 해당 세대에 대한 할당 임계값을 늘려 다음 수집에서 충분한 회수 메모리 크기가 확보되도록 합니다.CLR은 응용 프로그램의 작업 집합이 너무 커지지 않도록 하는 것과 가비지 수집이 너무 많은 시간을 소요하지 않도록 하는 두 가지 우선 순위 사이에서 지속적으로 균형을 유지합니다.

임시 세대 및 세그먼트

0세대와 1세대의 개체는 수명이 짧으므로 이러한 세대를 임시 세대라고 합니다.

임시 세대는 임시 세그먼트라는 메모리 세그먼트에 할당되어야 합니다.가비지 수집기에서 획득하는 새로운 각 세그먼트는 새로운 임시 세그먼트가 되며 0세대 가비지 수집에서 남은 개체를 포함합니다.이전의 임시 세그먼트는 새로운 2세대 세그먼트가 됩니다.

임시 세그먼트에는 2세대 개체가 포함될 수 있습니다.2세대 개체는 여러 세그먼트를 사용할 수 있습니다(프로세스에 필요하고 메모리가 허용하는 한도만큼).

임시 가비지 수집에서 해제된 메모리의 크기는 임시 세그먼트의 크기로 제한됩니다.해제되는 메모리의 크기는 비활성 개체가 점유했던 공간에 비례합니다.

맨 위로 이동

가비지 수집 중 수행되는 작업

가비지 수집은 다음 단계로 구성됩니다.

  • 모든 활성 개체를 찾아 표시하는 표시 단계

  • 압축될 개체에 대한 참조를 업데이트하는 재배치 단계

  • 비활성 개체에 의해 점유된 공간을 회수하고 남은 개체를 압축하는 압축 단계.압축 단계에서는 가비지 수집에서 남은 개체가 세그먼트의 오래된 쪽으로 이동됩니다.

    2세대 수집은 여러 세그먼트를 점유할 수 있으므로 2세대로 승격된 개체는 오래된 세그먼트로 이동될 수 있습니다.1세대 및 2세대 남은 개체는 2세대로 승격되므로 모두 다른 세그먼트로 이동될 수 있습니다.

    대형 개체 힙은 압축되지 않습니다. 이 압축으로 인해 허용 한도를 넘는 시간 동안 메모리 사용량이 늘어날 수 있기 때문입니다.

가비지 수집기는 다음 정보를 사용하여 개체가 활성 개체인지 여부를 판단합니다.

  • 스택 루트

    JIT(Just-In-Time) 컴파일러 및 스택 워크에서 제공한 스택 변수

  • 가비지 수집 핸들

    이러한 핸들은 관리되는 개체를 가리키며 사용자 코드 또는 공용 언어 런타임에 의해 할당될 수 있습니다.

  • 정적 데이터

    다른 개체를 참조할 수 있는 응용 프로그램 도메인의 정적 데이터.각 응용 프로그램 도메인은 해당 정적 개체를 추적합니다.

가비지 수집이 시작되기 전에 가비지 수집을 트리거한 스레드를 제외한 모든 관리되는 스레드가 일시 중단됩니다.

다음 그림에서는 가비지 수집을 트리거하여 다른 스레드가 일시 중단되도록 하는 스레딩을 보여 줍니다.

가비지 수집을 트리거하는 스레드

맨 위로 이동

관리되지 않는 리소스 조작

가비지 수집기는 관리되는 힙의 메모리만 추적하므로 관리되는 개체가 네이티브 파일 핸들을 사용하여 관리되지 않는 개체를 참조하는 경우에는 관리되는 개체를 명시적으로 해제해야 합니다.

관리되는 개체의 사용자는 개체에 사용되는 네이티브 리소스를 삭제할 수 없습니다.정리 작업을 수행하려면 관리되는 개체를 종료 가능 개체로 만들면 됩니다.종료는 개체가 더 이상 사용되지 않을 때 실행하는 정리 작업으로 구성됩니다.관리되는 개체가 소멸되면 해당 종료자 메서드에 지정된 정리 작업이 수행됩니다.

종료 가능 개체가 소멸된 것으로 확인되는 경우 해당 종료자는 정리 작업이 실행되도록 큐에 저장되지만 개체 자체는 다음 세대로 승격됩니다.따라서 개체가 가비지 수집에 의해 회수되었는지 여부를 확인하려면 이 세대에 발생하는 다음 가비지 수집(바로 다음 가비지 수집이 아닐 수도 있음)을 기다려야 합니다.

맨 위로 이동

워크스테이션 및 서버 가비지 수집

가비지 수집기는 자체 조정되며 다양한 시나리오에서 작동 가능합니다.설정할 수 있는 유일한 옵션은 작업 부하의 특징을 기반으로 하는 가비지 수집의 유형입니다.CLR은 다음 유형의 가비지 수집을 제공합니다.

  • 모든 클라이언트 워크스테이션 및 독립 실행형 PC를 위한 워크스테이션 가비지 수집.이는 런타임 구성 스키마의 <gcServer> 요소에 대한 기본값입니다.

    워크스테이션 가비지 수집은 동시 수집 또는 비동시 수집일 수 있습니다.동시 가비지 수집의 경우 가비지 수집 중 관리되는 스레드가 작업을 계속 수행할 수 있습니다.

    .NET Framework 버전 4부터 백그라운드 가비지 수집이 동시 가비지 수집을 대체합니다.

  • 높은 처리 속도 및 확장성이 필요한 서버 응용 프로그램을 위한 서버 가비지 수집

다음 그림에서는 서버에서 가비지 수집을 수행하는 전용 스레드를 보여 줍니다.

서버 가비지 수집

가비지 수집 구성

런타임 구성 스키마의 <gcServer> 요소를 사용하여 CLR에서 수행할 가비지 수집의 유형을 지정할 수 있습니다.이 요소의 enabled 특성을 false(기본값)로 설정하면 CLR은 워크스테이션 가비지 수집을 수행합니다.enabled 특성을 true로 설정하면 CLR은 서버 가비지 수집을 수행합니다.

동시 가비지 수집은 런타임 구성 스키마의 <gcConcurrent> 요소를 통해 지정됩니다.기본 설정은 enabled입니다.동시 가비지 수집은 워크스테이션 가비지 수집에서만 사용할 수 있으며 서버 가비지 수집에는 아무런 영향을 미치지 않습니다.

관리되지 않는 호스팅 인터페이스를 통해 서버 가비지 수집을 지정할 수도 있습니다.ASP.NET 및 Microsoft SQL Server 2005은(는) 응용 프로그램이 이러한 환경 내에서 호스팅되는 경우 서버 가비지 수집을 자동으로 활성화합니다.

워크스테이션 가비지 수집과 서버 가비지 수집을 비교할 때 고려할 사항

워크스테이션 가비지 수집에는 다음과 같은 스레딩 및 성능 고려 사항이 있습니다.

  • 수집은 가비지 수집을 트리거한 사용자 스레드에서 발생하여 동일한 우선 순위를 유지합니다.사용자 스레드는 일반적으로 보통 우선 순위로 실행되므로 보통 우선 순위 스레드에서 실행되는 가비지 수집기는 다른 스레드와 CPU 시간을 두고 경쟁해야 합니다.

    네이티브 코드를 실행하는 스레드는 일시 중단되지 않습니다.

  • 프로세서가 하나뿐인 컴퓨터에서는 <gcServer> 설정에 관계없이 항상 워크스테이션 가비지 수집이 사용됩니다.서버 가비지 수집을 지정하는 경우 CLR은 동시성이 비활성화된 워크스테이션 가비지 수집을 사용합니다.

서버 가비지 수집에는 다음과 같은 스레딩 및 성능 고려 사항이 있습니다.

  • 수집은 THREAD_PRIORITY_HIGHEST priority level에서 실행되는 여러 전용 스레드에서 발생합니다.

  • 가비지 수집을 수행하기 위한 전용 스레드와 힙이 각 CPU에 제공되며, 힙은 동시에 수집됩니다.각 힙에는 소형 개체 힙과 대형 개체 힙이 포함되며 모든 힙은 사용자 코드에서 액세스할 수 있습니다.서로 다른 힙의 개체는 상호 참조할 수 있습니다.

  • 여러 가비지 수집 스레드가 함께 작동하므로 같은 크기의 힙에서 서버 가비지 수집이 워크스테이션 가비지 수집에 비해 더 빠릅니다.

  • 서버 가비지 수집은 세그먼트가 큰 경우가 많습니다.

  • 서버 가비지 수집은 많은 리소스를 소비할 수 있습니다.예를 들어 프로세서가 네 개인 컴퓨터에서 12개의 프로세스가 실행 중이고 이러한 프로세스가 모두 서버 가비지 수집을 사용하는 경우 전용 가비지 수집 스레드는 48개가 됩니다.메모리 부하가 높은 상태에서 모든 프로세스가 가비지 수집을 시작하면 가비지 수집기는 48개의 스레드를 예약하게 됩니다.

수백 개의 응용 프로그램 인스턴스를 실행하는 경우 동시 가비지 수집이 사용하지 않도록 설정된 워크스테이션 가비지 수집을 사용할 수 있습니다.이렇게 하면 컨텍스트 전환이 줄어들어 성능이 향상됩니다.

맨 위로 이동

동시 가비지 수집

워크스테이션 가비지 수집에서 동시 가비지 수집을 활성화할 수 있습니다. 동시 가비지 수집을 사용하면 대부분의 가비지 수집 기간 동안 가비지 수집을 수행하는 전용 스레드와 다른 스레드가 동시에 실행될 수 있습니다.이 옵션은 2세대 가비지 수집에만 영향을 미칩니다. 0세대 및 1세대는 매우 빠르게 완료되므로 항상 비동시 수집입니다.

동시 가비지 수집을 사용하면 수집을 위한 일시 중지가 최소화되어 대화형 응용 프로그램의 응답성이 향상됩니다.동시 가비지 수집 스레드가 실행되는 대부분의 시간 동안 관리되는 스레드가 계속 실행될 수 있습니다.이로써 가비지 수집이 발생하는 동안 일시 중지 시간이 더 짧아지게 됩니다.

여러 프로세스가 실행될 때 성능을 개선하려면 동시 가비지 수집을 사용하지 않도록 설정합니다.

동시 가비지 수집은 전용 스레드에서 수행됩니다.기본적으로 CLR은 동시 가비지 수집을 활성화하여 워크스테이션 가비지 수집을 실행합니다.이는 단일 프로세서 및 다중 프로세서 컴퓨터에서 모두 마찬가지입니다.

동시 가비지 수집 동안 힙에 소형 개체를 할당하는 기능은 동시 가비지 수집이 시작될 때 임시 세그먼트에 남아 있는 개체에 의해 제한됩니다.세그먼트의 끝에 도달하면 소형 개체 할당을 수행해야 하는 관리되는 스레드가 일시 중단된 동안 동시 가비지 수집이 완료되기를 기다려야 합니다.

동시 수집 중에 개체를 할당할 수 있으므로 동시 가비지 수집의 작업 집합은 비동시 가비지 수집에 비해 약간 더 큽니다.그러나 할당하는 개체가 작업 집합의 일부가 될 수 있으므로 이는 성능에 영향을 미칠 수 있습니다.기본적으로 동시 가비지 수집은 일시 중지 시간이 짧은 대신 CPU 및 메모리를 더 소비합니다.

다음 그림에서는 개별 전용 스레드에서 수행되는 동시 가비지 수집을 보여 줍니다.

동시 가비지 수집

맨 위로 이동

백그라운드 가비지 수집

백그라운드 가비지 수집에서 임시 세대(0세대 및 1세대)는 2세대 수집이 진행되는 동안 필요에 따라 수집됩니다.백그라운드 가비지 수집은 동시 가비지 수집에서 자동으로 활성화되며 사용자가 설정할 부분이 없습니다.백그라운드 가비지 수집은 동시 가비지 수집을 대체합니다.백그라운드 가비지 수집은 동시 가비지 수집과 마찬가지로 전용 스레드에서 수행되며 2세대 수집에만 적용될 수 있습니다.

참고참고

백그라운드 가비지 수집은 .NET Framework 4 이상 버전에서만 사용할 수 있습니다.

백그라운드 가비지 수집 중의 임시 세대 수집을 포그라운드 가비지 수집이라고 합니다.포그라운드 가비지 수집이 발생하면 모든 관리되는 스레드가 일시 중단됩니다.

백그라운드 가비지 수집이 진행 중이고 0세대에 충분한 개체가 할당된 경우 CLR은 0세대 또는 1세대 포그라운드 가비지 수집을 수행합니다.전용 백그라운드 가비지 수집 스레드는 안전한 지점을 수시로 검사하여 포그라운드 가비지 수집 요청이 있는지 여부를 확인합니다.요청이 있는 경우 포���라운드 가비지 수집이 발생할 수 있도록 백그라운드 수집은 스스로를 일시 중단합니다.포그라운드 가비지 수집이 완료되고 나면 전용 백그라운드 가비지 수집 스레드와 사용자 스레드가 다시 시작됩니다.

백그라운드 가비지 수집 중에 임시 가비지 수집이 발생할 수 있으므로 백그라운드 가비지 수집은 동시 가비지 수집에 의해 적용된 할당 제한을 제거합니다.이는 백그라운드 가비지 수집이 임시 세대에서 비활성 개체를 제거할 수 있고, 필요한 경우 1세대 가비지 수집 중에 힙을 확장할 수도 있음을 의미합니다.

백그라운드 가비지 수집은 현재 서버 가비지 수집에 대해서는 사용할 수 없습니다.

다음 그림에서는 포그라운드 가비지 수집과 함께 발생하는 백그라운드 가비지 수집을 보여 줍니다.

백그라운드 가비지 수집

맨 위로 이동

참고 항목

개념

Posted by tornado
|

MS Chart Control

.NET/ASP.NET 2010. 3. 23. 10:58
Posted by tornado
|

IIS Log 분석툴..

.NET 2010. 3. 15. 17:15

[link] http://indihiang.codeplex.com/


Posted by tornado
|

[link] http://www.fusioncharts.com/free/


Posted by tornado
|

출처 : http://hind.pe.kr/791?TSSESSIONhindpekr=5ab93c06251396a7584632a043897115


MOSS 2007에서 아래와 같은 형태로 구성 시 위의 이벤트 로그가 계속 쌓이게 된다.

1. Root 사이트가 게시 사이트 형태인 경우 ( 공동 작업 포탈이든, 게시 사이트 든..)
2. Root 사이트에 하위 Application으로 사이트를 추가하여 구성한 경우.
   ( 보통 가상 디렉터리 만들 때, 기능 옵션에 실행을 체크하여 넣으면 "기어" 표시가 생기면서
     하위 응용 프로그램으로 구성되는 경우 )

보낸 사람 ForBlog2
위와 같은 형태에 있을 때 가상 디렉터리 이하의 특정 리소스(JS 파일이든, ASPX 파일이든)에 접근하다가, 아래와 같은 이벤트로그를 뿜어댄다.

Event Type:    Error
Event Source:    Office SharePoint Server
Event Category:    게시 캐시
Event ID:    5785
Date:        2009-02-25
Time:        오전 10:57:07
User:        N/A
Computer:    KYOKO
Description:
출력 캐싱에 대한 게시 사용자 지정 문자열 처리기에 연결할 수 없습니다. IIS 인스턴스 ID는 '1986061912'이고 URL은 'http://www.knoie.com/virtualdir1/Images/presence/presence_off.gif'입니다.

For more information, see Help and Support Center at http://go.microsoft.com/fwlink/events.asp.


위의 내용을 이곳 저곳을 기웃 거리다가 한 Technet 의 토론 내용 중 하나의 쓰레드에 눈이 가서 훝어 본 결과 단 한줄로 해결 되었다.

해당 가상 디렉터리는 자체적인 응용 프로그램 쓰레드를 갖기 때문에, 보통 web.config를 별도로 구성하는 경우가 많다. 만일 없다면 기본 web.config를 만들어서 구성하신 뒤, module 부분에 추가하면 된다.

<httpModules>
      <remove name="PublishingHttpModule" />
       <add name="ScriptModule" type="System.Web.Handlers.ScriptModule, System.Web.Extensions, Version=3.5.0.0, Culture=neutral, PublicKeyToken=31BF3856AD364E35"/>
            <!--<remove name="ApplicationMasterPage" />-->
</httpModules>

web.config 에서 httpModules로 찾아서 해당하는 섹션이 보이면 굵게 보이는 저 한 줄을 넣어주면 된다.
나머지는 그대로 두면 된다. 만일 httpModules라는 섹션이 없다면, System.web 섹션을 찾아서 그 안에 다음과 같이 추가하면 된다.

<system.web>
     <httpModules>
          <remove name="PublishingHttpModule" />     
     </httpModules>
 .......
<system.web>


요는  PublishingHttpModule 이라는 Module을 없애면 된다.

Posted by tornado
|
Posted by tornado
|

[링크] http://www.dofactory.com/Patterns/Patterns.aspx


Design Patterns

Share/Save/Bookmark
Design patterns are recurring solutions to software design problems you find again and again in real-world application development. Patterns are about design and interaction of objects, as well as providing a communication platform concerning elegant, reusable solutions to commonly encountered programming challenges.

The Gang of Four (GoF) patterns are generally considered the foundation for all other patterns. They are categorized in three groups: Creational, Structural, and Behavioral. Here you will find information on these important patterns.

To give you a head start, the C# source code is provided in 2 forms: 'structural' and 'real-world'. Structural code uses type names as defined in the pattern definition and UML diagrams. Real-world code provides real-world programming situations where you may use these patterns.

A third form, '.NET optimized' demonstrates design patterns that exploit built-in .NET 2.0, 3.0, and 3.5 features, such as, generics, attributes, delegates, object and collection initializers, automatic properties, and reflection. These and much more are available in our Design Pattern Framework 3.5TM. See our Singleton page for a .NET 3.5 Optimized code sample.

Posted by tornado
|

출처 : http://zeemalik.wordpress.com/2007/11/27/how-to-call-client-side-javascript-function-after-an-updatepanel-asychronous-ajax-request-is-over/


How to call client-side Javascript function after an UpdatePanel asychronous (Ajax) request is over

Posted by zeemalik on November 27, 2007

If you are using AJAX then the only way i have found yet to give an alert to a user on return to the Asynchronous post back is to add an “end request” handler to the PageRequestManager.

In this way you can tell the request manager to run a javascript function on returning from a Asynchronous post back event of AJAX.

Code for doing this is :

function load()

{
   Sys.WebForms.PageRequestManager.getInstance().add_endRequest(EndRequestHandler);
}

where “EndRequestHandler” will be the name of your javascript function you want to call.
Call the above function in Onload event of <body> tag:

<body onload=”load()”>

function EndRequestHandler()

{

          alert(”You record has been saved successfully”);

}

Now If you want to give a different message based on your logic in server side code (code behind) then you can use a server side Hidden Field:

<input id=”hdnValue” type=”hidden” runat=”server”  value=”" />

Set its value in server side code on Asychronous Post Back: 

Protected Sub btn_Click(ByVal sender As Object, ByVal e As System.EventArgs) Handles btnCreateSample.Click

    If condition Then

hdnValue.value = “do this”

    Else     

hdnValue.value = “do that”

    End If 

End Sub

Now you can check the value of this Hidden Field in your Client Side EndRequestHandler function and give a different alert to user based on its value:

function EndRequestHandler()
{
     if (document.getElementById(’<%= hdnValue.ClientID %>’).value == “do this”)

     { 
          alert(”You record has been saved successfully”);
     } 
     else
     {
          alert(”There is an error”);
     }
 }

Posted by tornado
|

출처 : http://aspnet.4guysfromrolla.com/articles/051408-1.aspx


Introduction
Most security systems' passwords are case-sensitive. Case sensitivity nearly doubles the number of possible characters that can appear in the password, which makes it harder for nefarious users trying to break into the system. As a result, if a user logging into the system has Caps Lock turned on, they'll enter letters in the opposite case and not be able to login. Because the textboxes that collect user input typically are masked to prevent an onlooker from seeing a user's password, the user typing in her password may not realize that Caps Lock is on. To help prevent this type of user error, many login screens for desktop-based applications display some sort of warning if the user's Caps Lock is on when they start typing in their password.

Unfortunately, such functionality is rarely seen in web applications. A 4Guys reader recently asked me if there was a way to provide such feedback to a user logging into an ASP.NET website. The short answer is, Yes. It is possible to detect whether a user has Caps Lock enabled through JavaScript. Likewise, it's possible to have this client-side logic execute whenever a user starts typing in a particular textbox. With a little bit of scripting, such an interface could be devised.

After thinking about the implementation a bit, I decided to create a compiled server-side control that would emit the necessary JavaScript. This article introduces this control, WarnWhenCapsLockIsOn, and shows how it works and how to use it in an ASP.NET web page. Read on to learn more!


An Overview of the WarnWhenCapsLockIsOn Control's Functionality
The WarnWhenCapsLockIsOn control is designed to display a page developer-specified message if a user types in a specified TextBox control with Caps Lock on. The control extends the Label class so it has the same set of properties as the Label control: Text, Font, Width, CssClass, and so on. Use these properties to configure the message and the message's appearance.

In addition to the Label control's properties, the WarnWhenCapsLockIsOn control also has a TextBoxControlId property, which you must set to the ID of a TextBox control. This property is required. (To provide a Caps Lock warning for multiple TextBox controls on the page, add a WarnWhenCapsLockIsOn control for each TextBox.) If the user starts typing in the specified textbox with the Caps Lock on, the WarnWhenCapsLockIsOn control is displayed. The WarnWhenCapsLockIsOn control is hidden again when one of the following conditions apply:

  • The user types in the same textbox with Caps Lock off.
  • The WarnWhenCapsLockIsOn control has been displayed for WarningDisplayTime milliseconds. The WarningDisplayTime property defaults to a value of 2500, meaning that the control will be displayed for 2.5 seconds after the last character with Caps Lock on has been typed. You can lengthen or shorten this property value as needed. A value of 0 displays the warning until the user types in a character without Caps Lock on or after there's a postback.

To provide a warning to the user if Caps Lock is on, then, you'll add this control to the page, set its Text property (and, perhaps, other formatting properties), and indicate the TextBox to "watch" via the control's TextBoxControlId property. That's all there is to it! We'll discuss how to add the WarnWhenCapsLockIsOn control to your ASP.NET website project and look at an end-to-end example in the "Using the WarnWhenCapsLockIsOn Control in an ASP.NET Web Page" section later on in this article.

Initially Hiding the WarnWhenCapsLockIsOn Control
Whenever the ASP.NET page is loaded in the user's browser, the WarnWhenCapsLockIsOn control needs to be hidden so that it does not appear. The WarnWhenCapsLockIsOn control should only appear when the user starts typing in the specified textbox with Caps Lock on. To initially hide the WarnWhenCapsLockIsOn control, I overrided the control's AddAttributesToRender method and added code that set the visibility and display style attributes to "hidden" and "none", respectively.

public class WarnWhenCapsLockIsOn : System.Web.UI.WebControls.Label
{
   protected override void AddAttributesToRender(HtmlTextWriter writer)
   {
      base.AddAttributesToRender(writer);

      // Add a style attribute that hides this element (by default)
      writer.AddStyleAttribute(HtmlTextWriterStyle.Visibility, "hidden");
      writer.AddStyleAttribute(HtmlTextWriterStyle.Display, "none");

   }
}

The effects of these style attribute settings are evinced by the markup sent to the browser. Because the WarnWhenCapsLockIsOn control extends the Label class, it renders as a <span> element with the value of its Text property rendered as the <span> element's inner content, just like the Label control. In the style attribute you can see that the visibility and display settings have been configured to hide the control:

<span id="ID" style="visibility:hidden;display:none;">Value of Text property</span>

We now need to write JavaScript that sets the visibility and display settings to "visible" and "inline" whenever the user types into the corresponding textbox with Caps Lock on.

Executing JavaScript in Response to Typing in a Textbox
It is possible to execute JavaScript in response to a variety of client-side events, such as when the document has loaded, when the user changes the selection of a drop-down list, when an input field receives (or loses) focus, or when the user presses a key. To execute client-side script in response to a user pressing a key, use the onkeypress event like so:

<input type="text" ... onkeypress="action" />

The action can be inline script or a call to a function. In addition to noting that a key has been pressed, JavaScript offers the event object, which includes information such as what key was pressed and whether or not the Shift key was depressed, among other useful tidbits. In short, we need to add an onkeypress client-side event handler to the TextBox control referenced by the WarnWhenCapsLockIsOn control's TextBoxControlId property. The event handler called must determine whether Caps Lock is on or off and show or hide the WarnWhenCapsLockIsOn control in response.

To add client-side event handlers to a server-side Web control use the Attributes collection like so:

WebControlID.Attributes["attribute"] = "value";

The above code adds the markup attribute="value" to the Web control's rendered output. Usually this sort of logic is applied during the PreRender stage of the page lifecycle. Therefore, to implement this functionality I overrode the OnPreRender method in the WarnWhenCapsLockIsOn class (which is fired during the PreRender stage) and added the following code:

public class WarnWhenCapsLockIsOn : System.Web.UI.WebControls.Label
{
   protected override void OnPreRender(EventArgs e)
   {
      base.OnPreRender(e);

      if (this.Enabled)
      {
         /* We need to add two bits of JavaScript to the page:
          * (1) The include file that has the JavaScript function to check if Caps Lock is on
          * (2) JavaScript that will call the appropriate function in (1) when a key is pressed in the TextBoxControlId TextBox
          */

         // (1) Register the client-side function using WebResource.axd (if needed)
         if (this.Page != null && !this.Page.ClientScript.IsClientScriptIncludeRegistered(this.GetType(), "skmControls2"))
            this.Page.ClientScript.RegisterClientScriptInclude(this.GetType(), "skmValidators", this.Page.ClientScript.GetWebResourceUrl(this.GetType(), "skmControls2.skmControls2.js"));


         // (2) Call skm_CountTextBox onkeyup
         TextBox tb = GetTextBoxControl();
         tb.Attributes["onkeypress"] += string.Format("skm_CheckCapsLock( event, '{0}', {1});", this.ClientID, this.WarningDisplayTime);
      }
   }
}

The GetTextBoxControl method (not shown in this article) returns a reference to the TextBox control specified by the TextBoxControlId property. This referenced TextBox has its Attributes collection updated to include an onkeypress event handler that calls the JavaScript function skm_CheckCapsLock. The skm_CheckCapsLock function (which we'll examine shortly), is passed three input parameters:

  • event - information about the keypress event, including what key was pressed and whether the Shift key was depressed.
  • The value of the WarnWhenCapsLockIsOn's ClientID property - we need to supply the client-side id of the WarnWhenCapsLockIsOn control so that it can be displayed or hidden, depending on whether the user has Caps Lock on.
  • WarningDisplayTime - the number of milliseconds to display the Caps Lock warning; defaults to 2500 milliseconds (2.5 seconds).

The WarnWhenCapsLockIsOn control is one of a few controls in my open-source control library, skmControls2. Another control in the same library is the TextBoxCounter control, which interactively displays how many characters the user has currently typed into a given textbox. (For more information on the TextBoxCounter control, read: Creating a TextBox Word / Character Counter Control.) The TextBoxCounter control requires a bit of JavaScript, and that JavaScript is already defined in a file named skmControls2.js. This file is compiled as an embedded resource in the assembly and is loaded into the ASP.NET page on which the TextBoxCounter or WarnWhenCapsLockIsOn controls are used via a call to the GetWebResourceUrl method. For more information on this technique see: Accessing Embedded Resources through a URL using WebResource.axd.

Because the skmControls2 library already has a JavaScript file, I decided to place the skm_CheckCapsLock function (and ancillary helper functions) there. It is injected into the ASP.NET page in the OnPreRender method (see step 1 in the comments in OnPreRender).

Determining Whether Caps Lock is On
When the keypress event is raised in client-side script, the event object contains information as to what key was pressed and whether the Shift key was depressed (along with whether Alt and Ctrl were depressed). It does not, however, indicate whether Caps Lock was on. The good news is that with a bit of code we can determine whether Caps Lock is on. If the user has entered a capital letter and the Shift key is not depressed, then Caps Lock must be on; likewise, if the user enters a lowercase letter and the Shift key is depressed, then Caps Lock is on.

The skm_CheckCapsLock function determines whether Caps Lock is on and, if so, calls the skm_ShowCapsWarning function, which displays the WarnWhenCapsLockIsOn control for a specified interval. If Caps Lock is not on then the skm_HideCapsWarning function is called, which hides the WarnWhenCapsLockIsOn control. The skm_CheckCapsLock function uses a modified version of a script created by John G. Wang, available online at http://javascript.internet.com/forms/check-cap-locks.html.

function skm_CheckCapsLock( e, warnId, dispTime ) {
   var myKeyCode = 0;
   var myShiftKey = e.shiftKey;
   
   if ( document.all ) {
      // Internet Explorer 4+
      myKeyCode = e.keyCode;
   } else if ( document.getElementById ) {
      // Mozilla / Opera / etc.
      myKeyCode = e.which;
   }
   
   if ((myKeyCode >= 65 && myKeyCode <= 90 ) || (myKeyCode >= 97 && myKeyCode <= 122)) {
      if (
         // Upper case letters are seen without depressing the Shift key, therefore Caps Lock is on
         ( (myKeyCode >= 65 && myKeyCode <= 90 ) && !myShiftKey )

         ||

         // Lower case letters are seen while depressing the Shift key, therefore Caps Lock is on
         ( (myKeyCode >= 97 && myKeyCode <= 122 ) && myShiftKey )
       )
      {
         skm_ShowCapsWarning(warnId, dispTime);
      }
      else {
         skm_HideCapsWarning(warnId);
      }
   }
}

The keen reader will note that this check doesn't really identify when Caps Lock is on or off. Rather, it identifies if Caps Lock is on or off when typing in an alphabetic character. If the user types in the number "9" or presses the left arrow, the first conditional statement will evaluate to false. In other words, the skm_ShowCapsWarning or skm_HideCapsWarning functions are only called when the user enters an alphabetic character.

The skm_ShowCapsWarning and skm_HideCapsWarning functions are not shown in this article; you'll have to download the source code to inspect them. They're both fairly straightforward: both reference the WarnWhenCapsLockIsOn control and then set the visibility and display properties to show or hide the warning message. The only trickiness deals with the code that displays the warning for at most a specified number of milliseconds after the user types in with Caps Lock on. Specifically, these functions use the JavaScript setTimeout and clearTimeout methods. For more information on these functions, see the JavaScript Timing Events tutorials at W3 Schools.

Using the WarnWhenCapsLockIsOn Control in an ASP.NET Web Page
The download available at the end of this article includes the complete source code for the WarnWhenCapsLockIsOn controls, as well as a demo ASP.NET website. To use the skmControls2 controls in an ASP.NET website, copy the DLL to the website's /Bin directory and then add the following @Register directive to the tops of the .aspx pages where you want to use the controls:

<%@ Register Assembly="skmControls2" Namespace="skmControls2" TagPrefix="skm" %>

(Alternatively, you can add this @Register directive in the Web.config file so that you do not need to add it to every ASP.NET page that uses the controls. See Tip/Trick: How to Register User Controls and Custom Controls in Web.config.)

The demo included in the download has an ASP.NET page that shows using the WarnWhenCapsLockIsOn control in two scenarios: on a stand-alone TextBox and on the Password TextBox in the Login control. Let's look at the stand-alone TextBox example first:

<b>Please enter your name:</b>
<asp:TextBox ID="YourName" runat="server"></asp:TextBox>

<skm:WarnWhenCapsLockIsOn runat="server" ID="WarnOnYourName"
           CssClass="CapsLockWarning" TextBoxControlId="YourName"
           WarningDisplayTime="5000"><b>Warning:</b> Caps Lock is on.</skm:WarnWhenCapsLockIsOn>

<br />
<asp:Button ID="Button1" runat="server" Text="Submit" />

The declarative markup above shows three controls: a TextBox (YourName); a WarnWhenCapsLockIsOn control; and a Button Web control. The WarnWhenCapsLockIsOn control is configured to display the message "Warning: Caps Lock is on" when the user types into the YourName textbox with Caps Lock on. It uses the CSS class CapsLockWarning for its styling, which I've defined on the page; the class specifies a light yellow background, padding, centered text, and a red border. The warning message is displayed for (at most) five seconds.

The following screen shot shows the demo page in action. Note that when Caps Lock is on and an alphabetic character is typed, the warning is displayed. This warning immediately disappears when Caps Lock is turned off and another alphabetic character is typed, or after five seconds, whatever comes first.

A warning is displayed when typing in the textbox with Caps Lock on.

This demo also shows how to apply the WarnWhenCapsLockIsOn control to the Password TextBox of a Login control. Start by adding a Login control to the page and then, from the Designer, select the "Convert to Template" from its smart tag. This will convert the Login control into a template, at which point you can add the WarnWhenCapsLockIsOn control in the Login user interface as needed, referencing the Password TextBox (whose ID property is "Password"). Be sure to put the WarnWhenCapsLockIsOn control within the Login control's template so that it can "see" the Password TextBox.

The WarnWhenCapsLockIsOn control can also be used in a Login control.

Happy Programming!

  • By Scott Mitchell
  • Posted by tornado
    |
    출처 : http://msdn.microsoft.com/ko-kr/library/cc438020(VS.71).aspx


    동적으로 웹 서버 컨트롤 템플릿 만들기

    여러 가지 이유로 인해, 런타임 전에는 필요한 템플릿과 이 템플릿에 포함해야 할 텍스트나 컨트롤을 알 수 없는 경우도 있습니다. 이러한 경우에는 코드를 사용하여 동적으로 템플릿을 만들 수 있어야 합니다.

    참고   템플릿을 Web Forms 사용자 정의 컨트롤로 만들어 이 템플릿을 페이지에 있는 컨트롤에 동적으로 바인딩해도 됩니다. 자세한 내용은 템플릿 기반 사용자 정의 컨트롤 만들기를 참조하십시오.

    템플릿을 사용하는 모든 컨트롤(DataList, RepeaterDataGrid 컨트롤)에 대해 코드를 사용하여 템플릿을 만들 수 있습니다. DataGrid 컨트롤의 경우, 다른 두 컨트롤에 대한 행 형식의 템플릿을 사용하지 않고 열을 정의하는 템플릿을 사용합니다.

    참고   DataGrid 컨트롤에 대한 템플릿 열을 만들 때는 몇 가지 차이점이 있습니다. 자세한 내용은 프로그래밍 방식으로 DataGrid 컨트롤에 템플릿 만들기를 참조하십시오.

    템플릿 클래스 만들기

    동적 템플릿을 만들려면 필요할 때 인스턴스화할 수 있는 템플릿 클래스를 만듭니다.

    참고   Visual Basic .NET에서 클래스를 만드는 데 대한 배경 설명을 보려면 클래스의 이해를 참조하십시오. Visual C# .NET의 경우에는 클래스를 참조하십시오.

    템플릿 클래스를 만들려면

    1. System.Web.UI 네임스페이스의 ITemplate 인터페이스를 구현하는 새 클래스를 만듭니다.
    2. 필요한 경우, 클래스에서 만들 템플릿의 형식(ItemTemplate, AlternatingItemTemplate 등)을 결정할 때 사용되는 값을 클래스의 생성자에 전달합니다.
         생성자에 템플릿 형식을 전달할 때 형식 안전성을 유지하려면 ListItemType 형식을 사용하여 생성자에 매개 변수를 추가하면 됩니다. ListItemType 열거형에서는 Repeater, DataListDataGrid 컨트롤에 대해 사용 가능한 템플릿 형식을 정의합니다.
    3. ITemplate 인터페이스의 유일한 멤버인 InstantiateIn 메서드를 클래스에 구현합니다. 이 메서드를 통해 텍스트 및 컨트롤의 인스턴스를 지정된 컨테이너에 삽입할 수 있습니다.
    4. InstantiateIn 메서드에서 템플릿 항목에 대한 컨트롤을 만들고 속성을 설정한 다음 부모의 Controls 컬렉션에 추가합니다. InstantiateIn 메서드에 전달된 참조를 통해 부모 컨트롤에 액세스할 수 있습니다.
      참고   Controls 컬렉션에 정적 텍스트를 직접 추가할 수는 없지만, Literal 컨트롤 또는 LiteralControl 컨트롤 등의 컨트롤을 만들고 Text 속성을 설정한 다음 이 컨트롤을 부모 컬렉션에 추가할 수는 있습니다.

      다음 예제에서는 일부 정적 텍스트("Item number:") 및 카운터를 표시하는 완전한 템플릿 클래스를 보여 줍니다. 카운터는 클래스에 대해 itemcount라는 공유 또는 정적 값(사용하는 언어에 따라 다름)으로 보존되며 새 항목이 만들어질 때마다 크기가 증가합니다.

      클래스에서는 만들어지는 템플릿의 형식을 나타내기 위해 ListItemType 열거형 값을 받는 명시적 생성자를 정의합니다. 만들어지는 템플릿의 형식에 따라 코드에서 서로 다른 종류의 컨트롤이 만들어지고 이 컨트롤은 부모 컨트롤의 Controls 컬렉션에 추가됩니다. 마지막으로, 대체 항목 템플릿에 대해 서로 다른 배경색을 가진 HTML 테이블이 만들어집니다.

      ' Visual Basic
      Private Class MyTemplate
         Implements ITemplate
         Shared itemcount As Integer = 0
         Dim TemplateType As ListItemType
      
         Sub New(ByVal type As ListItemType)
            TemplateType = type
         End Sub
      
         Sub InstantiateIn(ByVal container As Control) _
            Implements ITemplate.InstantiateIn
            Dim lc As New Literal()
            Select Case TemplateType
               Case ListItemType.Header
                  lc.Text = "<TABLE border=1><TR><TH>Items</TH></TR>"
               Case ListItemType.Item
                  lc.Text = "<TR><TD>Item number: " & itemcount.ToString _
                     & "</TD></TR>"
               Case ListItemType.AlternatingItem
                  lc.Text = "<TR><TD bgcolor=lightblue>Item number: " _
                     & itemcount.ToString & "</TD></TR>"
               Case ListItemType.Footer
                  lc.Text = "</TABLE>"
            End Select
            container.Controls.Add(lc)
            itemcount += 1
         End Sub
      End Class
      
      // C#
      public class MyTemplate : ITemplate
      {
         static int itemcount = 0;
         ListItemType templateType;
      
         public MyTemplate(ListItemType type)
         {
            templateType = type;
         }
      
         public void InstantiateIn(System.Web.UI.Control container)
         {
            Literal lc = new Literal();
            switch( templateType )
            {
               case ListItemType.Header:
                  lc.Text = "<TABLE border=1><TR><TH>Items</TH></TR>";
                  break;
               case ListItemType.Item:
                  lc.Text = "<TR><TD>Item number: " + itemcount.ToString() +
                     "</TD></TR>";
                  break;
               case ListItemType.AlternatingItem:
                  lc.Text = "<TR><TD bgcolor=lightblue>Item number: " + 
                     itemcount.ToString() + "</TD></TR>";
                  break;
               case ListItemType.Footer:
                  lc.Text = "</TABLE>";
                  break;
            }
            container.Controls.Add(lc);
            itemcount += 1;
         }
      }

    동적 템플릿 사용

    사용할 수 있는 동적 템플릿이 있으면 이 템플릿을 코드에서 인스턴스화할 수 있습니다.

    참고   DataGrid 컨트롤에서 하나의 동적 템플릿을 열로 사용하여 작업하려면 프로그래밍 방식으로 DataGrid 컨트롤에 템플릿 만들기를 참조하십시오.

    동적 템플릿을 사용하려면

    1. 동적 템플릿의 인스턴스를 만들고 적합한 경우 여기에 항목 형식의 값을 전달합니다.
    2. Repeater 또는 DataList 컨트롤의 템플릿 속성 중 하나에 ItemTemplate, AlternatingItemTemplate, HeaderTemplate 등의 인스턴스를 할당합니다.

      다음 예제에서는 동적 템플릿을 Repeater 컨트롤과 함께 사용하는 방법을 보여 줍니다. 이 예제에서는 페이지가 로드되는 동안 컨트롤이 데이터 소스에 바인딩되기 전에 템플릿이 인스턴스화됩니다.

      ' Visual Basic
      Private Sub Page_Load(ByVal sender As System.Object, _
      ByVal e As System.EventArgs) Handles MyBase.Load
         Repeater1.HeaderTemplate = New MyTemplate(ListItemType.Header)
         Repeater1.ItemTemplate = New MyTemplate(ListItemType.Item)
         Repeater1.AlternatingItemTemplate = _
            New MyTemplate(ListItemType.AlternatingItem)
         Repeater1.FooterTemplate = New MyTemplate(ListItemType.Footer)
         SqlDataAdapter1.Fill(DsCategories1)
         Repeater1.DataBind()
      End Sub
      
      // C#
      private void Page_Load(object sender, System.EventArgs e)
      {
         Repeater1.HeaderTemplate = new MyTemplate(ListItemType.Header);
         Repeater1.ItemTemplate = new MyTemplate(ListItemType.Item);
         Repeater1.AlternatingItemTemplate = 
            new MyTemplate(ListItemType.AlternatingItem);
         Repeater1.FooterTemplate = new MyTemplate(ListItemType.Footer);
         sqlDataAdapter1.Fill(dsCategories1);
         Repeater1.DataBind();
      }

    템플릿에 데이터 바인딩 추가

    템플릿 클래스 안에서 데이터에 액세스할 수 있는 방법은 클래스를 만드는 방법에 따라 다양합니다. 이 중에서 페이지 아키텍처 자체에서 데이터 바인딩을 구현하는 것이 가장 좋습니다. 템플릿에 컨트롤을 추가하면 이러한 컨트롤의 DataBinding 이벤트에 대한 처리기도 추가됩니다. 이 이벤트는 템플릿 항목과 해당 템플릿과 관련된 컨트롤이 모두 만들어진 후에 발생하며 데이터를 페치하여 컨트롤에서 사용할 수 있도록 합니다.

    참고   템플릿에 컨트롤을 만들 때 디자인 타임에 템플릿을 정의할 때처럼 데이터 바인딩 식을 문자열로 포함할 수 없습니다. 데이터 바인딩 식은 템플릿이 만들어지기 전에 발생하는 페이지 처리 과정 단계에서 코드로 변환되기 때문입니다.

    DataBinding 이벤트에 대한 처리기에서 컨트롤의 내용을 조작할 수 있습니다. 필수적인 것은 아니지만, 보통 임의의 위치에서 데이터를 페치(fetch)하여 컨트롤의 Text 속성에 할당합니다.

    참고   Web Forms 페이지에서의 데이터 바인딩 작업에 대한 배경 설명은 Web Forms 데이터 바인딩을 참조하십시오.

    동적 템플릿에 데이터 바인딩을 추가하려면 다음 작업을 수행해야 합니다.

    • 템플릿에서 만든 컨트롤에 데이터 바인딩 이벤트 처리기를 추가합니다.
    • 바인딩 대상이 되는 처리기를 만듭니다. 바인딩할 데이터를 이 처리기에서 가져온 다음, 바인딩되는 컨트롤의 해당 속성에 할당합니다.

    데이터 바인딩 이벤트 처리기를 추가하려면

    • 동적 템플릿에 컨트롤을 만든 후에 표준 명령을 사용하여 컨트롤의 DataBinding 이벤트를 나중에 만들 메서드에 바인딩합니다.
      참고   동적으로 이벤트 처리기를 추가하는 방법에 대한 자세한 내용은 AddHandler 및 RemoveHandler(Visual Basic용)와 이벤트 자습서(Visual C#용)를 참조하십시오.

      다음 예제에서는 새로 만든 컨트롤을 TemplateControl_DataBinding 메서드에 바인딩하는 템플릿 클래스의 코드를 보여 줍니다.

      ' Visual Basic
      Dim lc As New Literal()
         Case ListItemType.Item
         lc.Text = "<TR><TD>"
         AddHandler lc.DataBinding, AddressOf TemplateControl_DataBinding
      
      // C#
      Literal lc = new Literal();
      case ListItemType.Item:
         lc.Text = "<TR><TD>";
         lc.DataBinding += new EventHandler(TemplateControl_DataBinding);
         break;

      이 예제에서 리터럴 컨트롤의 Text 속성에 추가하는 텍스트는 이전의 예제에 나온 텍스트와는 다릅니다. 여기에는 표 행의 시작 부분과 항목 템플릿에 대한 셀만 포함되어 있습니다. 데이터 바인딩 이벤트 처리기에서 셀과 행을 완성합니다.

    다음 단계에서는 컨트롤에 데이터가 바인딩될 때 호출되는 이벤트 처리기를 만듭니다.

    DataBinding 이벤트에 대한 처리기를 만들려면

    1. 템플릿 클래스를 구성하며 이 클래스의 InstantiateIn 등과 같은 다른 메서드와 동일한 수준의 역할을 수행할 메서드를 만듭니다. 처리기의 이름은 이벤트 처리기를 바인딩할 때 사용했던 이름과 같아야 합니다. 이 이벤트에는 다음과 같은 서명이 있어야 합니다.
      ' Visual Basic
      Private Sub TemplateControl_DataBinding(ByVal sender As Object, _
         ByVal e As System.EventArgs)
      
      // C#
      private void TemplateControl_DataBinding(object sender,
         System.EventArgs e)
    2. 다음을 수행하여 현재 템플릿 항목에 대한 데이터가 포함된 DataItem 개체의 참조를 가져옵니다.
      1. 템플릿 항목에 대한 참조를 가져옵니다. 참조를 보관할 변수를 만든 다음 이 변수에 컨트롤의 NamingContainer 속성에서 가져오는 값을 할당합니다.
      2. 이 참조를 사용하여 이름 지정 컨테이너(템플릿 항목)의 DataItem 속성을 가져옵니다.
      3. DataItem 개체에서 데이터 열 등의 개별 데이터 요소를 추출하고, 이 요소를 사용하여 바인딩 대상 컨트롤의 속성을 설정합니다.

        다음 코드에서는 동적 템플릿 안에서 데이터 바인딩을 수행하는 방법 중 하나를 보여 줍니다. 여기에서는 Repeater 컨트롤의 템플릿에서 만들어지는 Literal 컨트롤에 대한 데이터 바인딩 이벤트 처리기의 전체 코드를 보여 줍니다.

        ' Visual Basic
        Private Sub TemplateControl_DataBinding(ByVal sender As Object, _
           ByVal e As System.EventArgs)
           Dim lc As Literal
           lc = CType(sender, Literal)
           Dim container As RepeaterItem
           container = CType(lc.NamingContainer, RepeaterItem)
           lc.Text &= DataBinder.Eval(container.DataItem, "CategoryName")
           lc.Text &= "</TD></TR>"
        End Sub
        
        // C#
        private void TemplateControl_DataBinding(object sender,
        System.EventArgs e)
        {
           Literal lc;
           lc = (Literal) sender;
           RepeaterItem container = (RepeaterItem) lc.NamingContainer;
           lc.Text += DataBinder.Eval(container.DataItem, "CategoryName");
           lc.Text += "</TD></TR>";
        }
        참고   템플릿에 여러 형식의 컨트롤이 있는 경우 각 컨트롤 형식마다 서로 다른 데이터 바인딩 이벤트 처리기를 만들어야 합니다.

    참고 항목

    Posted by tornado
    |
    출처 : http://www.eggheadcafe.com/articles/system.xml.xmlserialization.asp


    Related Articles: XmlSerializer to Serialize Class to Xml and Bulk Load Data
     
    Object Serialization is a process through which an object's state is transformed into some serial data format, such as XML or a binary format.  For example, you can serialize an object and transport it over the Internet using HTTP between a client and a server.  On the other end, deserialization reconstructs the object from the stream.  XML was designed to be a technology for data exchange across heterogeneous systems.  It can be easily transmitted between distributed components because of its platform independence and its simple, text-based, self-describing format.  In this article I will discuss the serialization of custom business objects to XML and reconstruction the object back from the XML string, using C#.  This process is called XML serialization and is very well supported by .Net.
     
    Some good uses for serialization/deserialization include:
  • Storing user preferences in an object.
  • Maintaining security information across pages and applications.
  • Modification of XML documents without using the DOM.
  • Passing an object from one application to another.
  • Passing an object from one domain to another.
  • Passing an object through a firewall as an XML string.
  • These are only a few of the many possibilities that serialization opens up for us.
     
    Suppose we have an object defined and instantiated as shown below:
     class Person
      {
         private String personName;
         private Int32 personAge;
         public String Name
         { 
           get { return personName;  } 
           set { personName = value; }
         } 
         public Int32 Age 
         {
           get { return personAge; }
           set { personAge = value;}
         }
       }
    
    
    Instantiation of the class is shown below:
       Person oPerson = new Person(); 
       oPerson.Name = "Anthony";
       oPerson.Age = 38;  


    Let's say that for some reason, we wanted to save a copy of this object just as it is at this very moment.  We could serialize it as an XML document that would look something like this:
    Anthony 38
    Then, at some later time when we needed to use the object again, we could just deserialize it and have our object restored to us just as it was at the moment we serialized it.  However XML serialization follows certain rules and the classes defined by us have to conform to these rules.
    1. XML serialization serializes only the public fields and property values of an object into an XML stream
    2. XML serialization does not include type information
    3. XML serialization requires a default constructor to be declared in the class that is to be serialized
    4. XML serialization requires all properties that are to be serialized as read write properties.  Read only properties are not serialized.
     
    Serialize class
    The .Net framework provides a rich collection of classes for serialization.  As we are concerned with XML serialization, we will examine the use of the XmlSerializer class.  This is the central class for XML serialization and its most important methods are the Serialize and Deserialize methods.  Most of the articles discussing XML serialization use IO streams for saving serialized data into XML files, however in my example I will demonstrate the use of XML serialization to convert an object into XML string and store it in a memory stream instead of an XML file.  This technique is extremely useful in cases where a complex object is to be converted to XML string and its properties have to be manipulated and then the object recreated from the XML string on the fly!!
     
    Attributes
    Before we start with the process of demonstrating the technique of XML serialization let us have a small discussion on Metadata Attributes.  A complete discussion of Metadata Attributes is beyond the scope of this article.  Nevertheless we need to understand the concepts behind metadata attributes to understand how XML serialization works.  Attributes are annotations to an interface or a class definition to specify certain behavior.  Assemblies, classes, fields and methods, each can have attributes.  Some are used by the compiler, some are used by the runtime, e.g. to identify a method requires a call to a web service, or how to serialize a class to XML.  There is very little overhead associated when using attributes.  Attaching attributes to a class is done directly in the source code.
     
    The syntax to initialize a metadata attribute and attach
    it to a class or a method in C# is either:
     [Attribute(constructor-parameters-list )] 
    or: 
    [Attribute(constructor-parameters-list, property=value, ... )] 
    
    // The System.Xml.Serialization namespace introduces a set of attributes
    // to control how classes are mapped to XML.  Let's look at a quick example:
    // One of the attributes used with XML serialization is the XmlRootAttribute
    // to change the name of the root element of a serialization hierarchy."
    
    You would add the XmlRootAttribute to a class like this: 
    
    using System.Xml.Serialization; 
    [XmlRootAttribute(Name="Human", IsNullable=false)] 
    public class Person 
    { 
    // class implementation goes here 
    } 


    If we make this change in the class declaration of listing 1, and serialize the instance of this class we will get the XML generated resembling the one shown below:
    <Human> 
    <Name>Anthony</Name> 
    <Age>38</Age> 
    </Human> 


    We would be using UTF-8 encoding for the creating the XML stream for the custom object as it supports a wide range of Unicode character values and surrogates.  For this purpose, we will make use of the UTF8Encoding class provided by the .Net framework.  For more information on UTF8Encoding you may want to refer to MSDN at:
    UTF8Encoding
    For explaining the concept of XML serialization I will create and use a demo class Animal with a number of properties that describe an animal such as name, length, weight, place of existence etc.  First create a C# console application using the Visual Studio.Net and name the project as MySerializer.  This will automatically create a namespace MySerializer.  Import the following namespaces into the project:
    1. System.Xml.Serialization
    2. System.IO
    3. System.Text
     
    Now add a new class and name it Animal.  The code for this class is given below:
     using System;
     
     namespace MySerializer
     {
         [XmlRootAttribute(ElementName="WildAnimal", IsNullable=false)]
         public class Animal
         {
           public Animal() {   }
    
           private String animalName;
           private String foodTypeCategory;
           private Boolean isDomesticed;
           private String placeOfExistence;
           private Int32 length;
           private Int32 height;
           private Int32 weight;
           public String AnimalName
                 { get { return animalName; } set { animalName = value; } }
           public String FoodTypeCategory 
                  { get { return foodTypeCategory; }
                    set { foodTypeCategory = value; } }
           public Boolean IsDomesticed
             { get { return isDomesticed; } 
               set { isDomesticed = value; } } 
           public String PlaceOfExistence 
               { get { return placeOfExistence; } set { placeOfExistence = value; } } 
           public Int32 Length { get { return length; } set { length = value; } }
           public Int32 Height { get { return height; } set { height = value; } } 
           public Int32 Weight { get { return weight; } set { weight = value; } } 
         }
     } 


    Listing 2: Custom class whose objects are to be serialized to XML
    When you create the C# console application a default class by the name of Class1 gets added to the project.  This class contains the definition of the Main function that is the entry point of the assembly.  Rename this class from "Class1" to clsMain.  In this class clsMain, we will define the custom methods to serialize and deserialize the object of the class Animal. Apart from these there are helper methods to convert a UTF-8 byte array to string and vice - versa.
    The definition of these methods is given below:
    private String UTF8ByteArrayToString(Byte[] characters) 
    { 
    
      UTF8Encoding encoding = new UTF8Encoding();
      String constructedString = encoding.GetString(characters);
      return (constructedString);
     }
     
     private Byte[] StringToUTF8ByteArray(String pXmlString)
     {
         UTF8Encoding encoding = new UTF8Encoding();
         Byte[] byteArray = encoding.GetBytes(pXmlString);
         return byteArray;
     } 


    Listing 3: Helper Methods
    Serialization
    Now we will add a custom method SerializeObject to the class clsMain which will use the XmlSerializer to serialize the object to XML string.
    The code for this method is given below:
     
    public String SerializeObject(Object pObject) 
    {
        try 
        {
          String XmlizedString = null;
          MemoryStream memoryStream = new MemoryStream();
          XmlSerializer xs = new XmlSerializer(typeof(Animal));
          XmlTextWriter xmlTextWriter = new XmlTextWriter(memoryStream, Encoding.UTF8);
          xs.Serialize(xmlTextWriter, pObject);
          memoryStream = (MemoryStream)xmlTextWriter.BaseStream;
          XmlizedString = UTF8ByteArrayToString(memoryStream.ToArray());
          return XmlizedString;
         }
         catch (Exception e) { System.Console.WriteLine(e); return null; }
     } 


    Listing 4: Method to serialize the custom business object
    Let us look through the code carefully.  First we create an instance of the MemoryStream class since we intend to keep the XML string in memory instead of saving it to a file.  Instantiate the XmlSerializer class with the type of the class that is to be serialized.  In our case this is the class Animal.  Now we use the XmlTextWriter Class that provides a fast, non-cached, forward-only way of generating streams or files containing XML data.  Notice that we use an overloaded constructor of the XmlTextWriter class and set the encoding to UTF-8.  This means that the XML document will be created with UTF-8 encoding.
    Now, we go to the most important step and that is calling one of the overloaded implementations of the Serialize method of the XmlSerializer object.  We now read the XML stream generated by the serializer from the BaseStream of the XmlTextWriter.  Since the BaseStream property returned by the XmlTextWriter is of the type System.IO.Stream, we can easily type cast it into MemoryStream (which is derived from System.IO.Stream) for our purpose.
    We now pass the Byte[] array returned by the ToArray() method of the MemoryStream object to the helper function UTF8ByteArrayToString.  This method constructs the XML string from the binary array and returns the same.  This small piece of trick is performed by the overloaded implementation of the GetString() method of the UTF8Encoding class.
     
    The output that is generated is given below:
    <?xml version="1.0" encoding="utf-8"?> 
    <WildAnimal xmlns:xsd="http://www.w3.org/2001/XMLSchema"
          xmlns:xsi="http://www.w3.org/2001/XMLSchema-instance"> 
    <AnimalName>Lion</AnimalName> 
    <FoodTypeCategory>Carnivore</FoodTypeCategory> 
    <IsDomesticed>false</IsDomesticed> 
    <PlaceOfExistence>Africa</PlaceOfExistence> 
    <Length>15</Length> 
    <Height>4</Height> 
    <Weight>900</Weight> 
    </WildAnimal> 


    Notice that all the properties defined in the class Animal are serialized into nodes and the name of the root also gets changed from Animal to WildAnimal, this is because we had included the attribute XmlRootAttribute in the declaration of the class Animal.
    Deserialization
    Just as we had created a custom method to serialize the object, we will create another method in the class clsMain which will use the Deserialize() method of the XmlSerializer class to recreate the object from the XML string.
    The code for this method is given below:
     public Object DeserializeObject(String pXmlizedString)
     {
         XmlSerializer xs = new XmlSerializer(typeof(Automobile));
         MemoryStream memoryStream = new MemoryStream(StringToUTF8ByteArray(pXmlizedString));
         XmlTextWriter xmlTextWriter = new XmlTextWriter(memoryStream, Encoding.UTF8);
         return xs.Deserialize(memoryStream);
      } 
    
    
    To get the Animal object back from the XML string you will simply call this method and pass the XML string.  It will first convert the XML string to a byte array (exactly the reverse of what we did in serialization) and then recreate the object from the XmlSerializer.
    There you are!!  You have now learnt the entire process of serializing a custom object into an XML string and keeping it in an in memory variable and then reconstructing it back using deserialization.  With the help of powerful XMLDocument class and other rich XML parsing classes and readers (such as XmlReader) provided by .Net you can change values or nodes , change attributes and apply advanced XML processing functions to XML document.

    '.NET > C#' 카테고리의 다른 글

    [C#] Network Driver Check  (0) 2011.08.11
    [펌] Design Pattern --> C# @.@;  (0) 2009.12.24
    ADHelper - An Active Directory Class  (0) 2009.08.17
    C# - Dynamically Invoke Web Service At Runtime  (0) 2009.08.13
    Change the group of a user in AD through C#  (0) 2009.06.16
    Posted by tornado
    |
    출처 : http://www.c-sharpcorner.com/uploadfile/craig_aroa/adhelper08232005064459am/adhelper.aspx?login=true&user=yheesung


    흠..  예전거 보다 더 좋아진것 같습니다.
    앞으로는 누가 더 검색 잘하고, 누가 더 짜집기 잘 하느냐에 따라 프로그래머의 레벨이 정해지지 않을까...


    Working on my latest project required quite a degree of development against the Active Directory. Not having had any AD experience before slowed me down for a while, but after trawling through lost of news groups etc, I gathered enough information to do what I needed to do.

    I have developed an ADHelper class that will should take care of most AD requirements, from :-

    • creating/updating a user
    • assigning a user to a group
    • enabling/disabling their account
    • setting password
    • checking if a user is valid
    • loggin in
    • checking if a user exists
    • performing queries

    All while returning DataSets to allow easy binding to datagrids etc.

    Im by no means an expert, but hopefully this helps some of you facing the same problems that I had.

    NOTES
    =====

    This class will return a mix of ActiveDirectory 'DirectoryEntry' objects and DataSets that u can plug into your business layer

    The first couple of lines that set the following private varables, need to be changed so that the 'Configuration' is the .Net ConfigurationSettings.AppSettings["xxx"].ToString, as the configuration object is a custom one that has not been included.

    private static string ADPath=Configuration.ADFullPath ;
    private static string
    ADUser = Configuration.ADAdminUser ;
    private static string ADPassword = Configuration.ADAdminPassword ;

    Change to :-

    private static string ADPath=ConfigurationSettings.AppSettings["ADFullPath"].ToString() ;
    private static string
    ADUser = ConfigurationSettings.AppSettings["ADAdminUser"].ToString() ;
    private static string ADPassword = ConfigurationSettings.AppSettings["ADAdminPassword"].ToString() ;


    Posted by tornado
    |

    출처 : http://www.crowsprogramming.com/archives/66


    C# - Dynamically Invoke Web Service At Runtime

    Web services have become an integral part of the communications between software over a network. There are a lot of ugly details behind how they work but thankfully C# hide a lot of those gory details. What you need to know is that there is a web service description (WSDL) that describes the available services and the data types they use (via XML).

    You can use the WSDL to create types in C# that can communicate with the web service. There are a couple of ways that you can do this. You can generate a proxy class using the WSDL utility in the .NET SDK and add it to your project. You can also download the WSDL file at runtime, create the proxy class, compile it into an assembly, and execute the methods on it. This allows you to dynamically invoke methods from a web service that aren’t known at build time and is the approach I will explore today.

    Step 1 – Obtain a ServiceDescriptionImporter

    We want to create a ServiceDescriptionImporter object that we can use to generate the web service proxy class. We have to pass to it the WSDL location which is an XML document.

    XmlTextReader xmlreader = new XmlTextReader(“MyWebService” + "?wsdl");
     
    ServiceDescription serviceDescription = ServiceDescription.Read(xmlreader);
     
    // build an importer, that assumes the SOAP protocol, client binding, and generates properties
    ServiceDescriptionImporter descriptionImporter = new ServiceDescriptionImporter();
    descriptionImporter.ProtocolName = "Soap";
    descriptionImporter.AddServiceDescription(serviceDescription, null, null);
    descriptionImporter.Style = ServiceDescriptionImportStyle.Client;
    descriptionImporter.CodeGenerationOptions = System.Xml.Serialization.CodeGenerationOptions.GenerateProperties;

    Step 2 – Compile an Assembly from the importer

    Now that we have the ServiceDescriptionImporter we need to use it to compile a proxy assembly that we can use to communicate with the web service. The assembly will exist in the users’ temporary folder.

    // a namespace and compile unit are needed by importer
    CodeNamespace codeNamespace = new CodeNamespace();
    CodeCompileUnit codeUnit = new CodeCompileUnit();
     
    codeUnit.Namespaces.Add(codeNamespace);
     
    ServiceDescriptionImportWarnings importWarnings = descriptionImporter.Import(codeNamespace, codeUnit);
     
    if (importWarnings == 0) // no warnings
    {
         // create a c# compiler
         CodeDomProvider compiler = CodeDomProvider.CreateProvider("CSharp");
     
         // include the assembly references needed to compile
         string[] references = new string[2] { "System.Web.Services.dll", "System.Xml.dll" };
     
         CompilerParameters parameters = new CompilerParameters(references);
     
         // compile into assembly
         CompilerResults results = compiler.CompileAssemblyFromDom(parameters, codeUnit);
     
         foreach (CompilerError oops in results.Errors)
         {
              // trap these errors and make them available to exception object
              throw new Exception("Compilation Error Creating Assembly");
         }
     
         // all done....
         return results.CompiledAssembly;
    }
    else
    {
         // warnings issued from importers, something wrong with WSDL
         throw new Exception("Invalid WSDL");
    }

    Step 3 – Execute Methods from the Web Service

    Finally we have an assembly built from the web service description and now we can invoke methods from it just like any other ordinary assembly we might use. To accomplish this we must use reflection to discover the correct method.

    object obj = this.webServiceAssembly.CreateInstance(serviceName);
     
    Type type = obj.GetType();
     
    return (T)type.InvokeMember(methodName, BindingFlags.InvokeMethod, null, obj, args);

    And there you have it, dynamic invocation of web service methods at runtime. Using this technique you can invoke methods from any arbitrary web service at runtime.

    Here is a full example class for dynamically invoking a web service method in C#.

    using System;
    using System.Collections.Generic;
    using System.Text;
    using System.Reflection;
    using System.CodeDom;
    using System.CodeDom.Compiler;
    using System.Web.Services;
    using System.Web.Services.Description;
    using System.Web.Services.Discovery;
    using System.Xml;
     
    namespace DynamicWebExample
    {
        class WebServiceInvoker
        {
            Dictionary<string, Type> availableTypes;
     
            /// <summary>
            /// Text description of the available services within this web service.
            /// </summary>
            public List<string> AvailableServices
            {
                get{ return this.services; }
            }
     
            /// <summary>
            /// Creates the service invoker using the specified web service.
            /// </summary>
            /// <param name="webServiceUri"></param>
            public WebServiceInvoker(Uri webServiceUri)
            {
                this.services = new List<string>(); // available services
                this.availableTypes = new Dictionary<string, Type>(); // available types
     
                // create an assembly from the web service description
                this.webServiceAssembly = BuildAssemblyFromWSDL(webServiceUri);
     
                // see what service types are available
                Type[] types = this.webServiceAssembly.GetExportedTypes();
     
                // and save them
                foreach (Type type in types)
                {
                    services.Add(type.FullName);
                    availableTypes.Add(type.FullName, type);
                }
            }
     
            /// <summary>
            /// Gets a list of all methods available for the specified service.
            /// </summary>
            /// <param name="serviceName"></param>
            /// <returns></returns>
            public List<string> EnumerateServiceMethods(string serviceName)
            {
                List<string> methods = new List<string>();
     
                if (!this.availableTypes.ContainsKey(serviceName))
                    throw new Exception("Service Not Available");
                else
                {
                    Type type = this.availableTypes[serviceName];
     
                    // only find methods of this object type (the one we generated)
                    // we don't want inherited members (this type inherited from SoapHttpClientProtocol)
                    foreach (MethodInfo minfo in type.GetMethods(BindingFlags.Instance | BindingFlags.Public | BindingFlags.DeclaredOnly))
                        methods.Add(minfo.Name);
     
                    return methods;
                }
            }
     
            /// <summary>
            /// Invokes the specified method of the named service.
            /// </summary>
            /// <typeparam name="T">The expected return type.</typeparam>
            /// <param name="serviceName">The name of the service to use.</param>
            /// <param name="methodName">The name of the method to call.</param>
            /// <param name="args">The arguments to the method.</param>
            /// <returns>The return value from the web service method.</returns>
            public T InvokeMethod<T>( string serviceName, string methodName, params object[] args )
            {
                // create an instance of the specified service
                // and invoke the method
                object obj = this.webServiceAssembly.CreateInstance(serviceName);
     
                Type type = obj.GetType();
     
                return (T)type.InvokeMember(methodName, BindingFlags.InvokeMethod, null, obj, args);
            }
     
            /// <summary>
            /// Builds the web service description importer, which allows us to generate a proxy class based on the 
            /// content of the WSDL described by the XmlTextReader.
            /// </summary>
            /// <param name="xmlreader">The WSDL content, described by XML.</param>
            /// <returns>A ServiceDescriptionImporter that can be used to create a proxy class.</returns>
            private ServiceDescriptionImporter BuildServiceDescriptionImporter( XmlTextReader xmlreader )
            {
                // make sure xml describes a valid wsdl
                if (!ServiceDescription.CanRead(xmlreader))
                    throw new Exception("Invalid Web Service Description");
     
                // parse wsdl
                ServiceDescription serviceDescription = ServiceDescription.Read(xmlreader);
     
                // build an importer, that assumes the SOAP protocol, client binding, and generates properties
                ServiceDescriptionImporter descriptionImporter = new ServiceDescriptionImporter();
                descriptionImporter.ProtocolName = "Soap";
                descriptionImporter.AddServiceDescription(serviceDescription, null, null);
                descriptionImporter.Style = ServiceDescriptionImportStyle.Client;
                descriptionImporter.CodeGenerationOptions = System.Xml.Serialization.CodeGenerationOptions.GenerateProperties;
     
                return descriptionImporter;
            }
     
            /// <summary>
            /// Compiles an assembly from the proxy class provided by the ServiceDescriptionImporter.
            /// </summary>
            /// <param name="descriptionImporter"></param>
            /// <returns>An assembly that can be used to execute the web service methods.</returns>
            private Assembly CompileAssembly(ServiceDescriptionImporter descriptionImporter)
            {
                // a namespace and compile unit are needed by importer
                CodeNamespace codeNamespace = new CodeNamespace();
                CodeCompileUnit codeUnit = new CodeCompileUnit();
     
                codeUnit.Namespaces.Add(codeNamespace);
     
                ServiceDescriptionImportWarnings importWarnings = descriptionImporter.Import(codeNamespace, codeUnit);
     
                if (importWarnings == 0) // no warnings
                {
                    // create a c# compiler
                    CodeDomProvider compiler = CodeDomProvider.CreateProvider("CSharp");
     
                    // include the assembly references needed to compile
                    string[] references = new string[2] { "System.Web.Services.dll", "System.Xml.dll" };
     
                    CompilerParameters parameters = new CompilerParameters(references);
     
                    // compile into assembly
                    CompilerResults results = compiler.CompileAssemblyFromDom(parameters, codeUnit);
     
                    foreach (CompilerError oops in results.Errors)
                    {
                        // trap these errors and make them available to exception object
                        throw new Exception("Compilation Error Creating Assembly");
                    }
     
                    // all done....
                    return results.CompiledAssembly;
                }
                else
                {
                    // warnings issued from importers, something wrong with WSDL
                    throw new Exception("Invalid WSDL");
                }
            }
     
            /// <summary>
            /// Builds an assembly from a web service description.
            /// The assembly can be used to execute the web service methods.
            /// </summary>
            /// <param name="webServiceUri">Location of WSDL.</param>
            /// <returns>A web service assembly.</returns>
            private Assembly BuildAssemblyFromWSDL(Uri webServiceUri)
            {
                if (String.IsNullOrEmpty(webServiceUri.ToString()))
                    throw new Exception("Web Service Not Found");
     
                XmlTextReader xmlreader = new XmlTextReader(webServiceUri.ToString() + "?wsdl");
     
                ServiceDescriptionImporter descriptionImporter = BuildServiceDescriptionImporter(xmlreader);
     
                return CompileAssembly(descriptionImporter);
            }
     
            private Assembly webServiceAssembly;
            private List<string> services;
        }
    }

    This C# class can be easily used to invoke web service methods:

    WebServiceInvoker invoker = new WebServiceInvoker(new Uri("http://localhost/services/test.php"));
     
    string service = “MyService”;
    string method = “MyMethod”;
     
    string[] args = new string[] { “arg1”, “arg2” };
     
    string result = invoker.InvokeMethod<string>(service, method, args);

    I’ve put together an example application that you can download to evaluate the class. It allows you to invoke methods from a web service entered on the GUI and see the return value. You can download it here.

    I hope you find this useful and if you have any questions or comments be sure to leave them here.

    April 8, 2009   Posted in: Programming

    27 Responses

    1. Joel Chinchilla - April 17, 2009

      Hi, I tried to test your example with a Java Web Service, however I need to pass credentials to Web Service. How can I do it?

    2. Neena - May 7, 2009

      Can I call this code from java

    3. crow - May 10, 2009

      Not that I am aware of.

    4. Sergio - May 14, 2009

      Hi!
      finally a good example on how to call WS dynamically!
      I tryed your code, and got this problem:
      - my WS is as follows:

      public class Service1 : System.Web.Services.WebService
      {
      public Service1()
      {
      InitializeComponent();
      }

      [WebMethod]
      public double Sum(double num1, double num2)
      {
      if ( guid == “”)
      return -1;
      return num1 + num2;
      }
      }

      couldn’t be as simpler as this.
      When i run your code, it does in fact create an assemby whith the correct Service1 classname and the Sum method.
      So everything seems to be ok.
      Problem is when I invoke Sum method it sends an exception saying that “Method ‘Service1.Sum’ not found” on line :
      return (T)type.InvokeMember(methodName, BindingFlags.InvokeMethod, null, obj, args);

      Any clue?

      thanks in advance!

    5. shortcuts - May 18, 2009

      Off-topic Help - Need a secure web proxy to get around my school firewall. Any suggestions?

    6. Jeremy Foster - May 19, 2009

      I have this implemented and working but I have run into a limitation. I can not figure out how to capture multiple returned values in the SOAP response. Do you know of a way to do this?

    7. Sergio - May 19, 2009

      Jeremy,

      what do you mean with “multiple returned values in the SOAP response”. A method only returns 1 value/object. The value itself can have a collection of values/objects. Is this what you meant?
      You may try to transform the returned value to XML. Use this:

      public static string SerializeObjectToXML(T obj)
      {
      try
      {
      string xmlString = null;
      MemoryStream memoryStream = new MemoryStream();
      System.Xml.Serialization.XmlSerializer xs = new System.Xml.Serialization.XmlSerializer(typeof(T));
      string s = “”;
      XmlTextWriter xmlTextWriter = new XmlTextWriter(memoryStream, Encoding.UTF8);
      System.Runtime.Serialization.Formatters.Soap.SoapFormatter xsoap = new System.Runtime.Serialization.Formatters.Soap.SoapFormatter();
      xsoap.Serialize(memoryStream, obj);

      xmlString = UTF8ByteArrayToString(memoryStream.ToArray());
      return xmlString;
      }
      catch(Exception ex)
      {
      ex.GetType();
      return string.Empty;
      }
      }

      public static T UnserializeObjectFromXML(string xml)
      {
      System.Xml.Serialization.XmlSerializer xs = new System.Xml.Serialization.XmlSerializer(typeof(T));
      MemoryStream memoryStream = new MemoryStream(StringToUTF8ByteArray(xml));
      XmlTextWriter xmlTextWriter = new XmlTextWriter(memoryStream, Encoding.UTF8);
      return (T)xs.Deserialize(memoryStream);
      }

      The Serialize method uses the SoapFormatter class, and in fact serializes the returned object just like what the Webservice call does.

    8. Izzy - May 22, 2009

      Hi, Crows.
      i get this webpage/artical by google.

      i got one question.

      if the input parameter of the method is normal types, like string, int etc, then it is ok.

      right now, I got one webservie, and its input parameter of the function is like this

      string
      string
      int
      int
      int
      int
      int
      int
      int
      int

      there is only one input parameter : TestMessage_input.
      it is a type which is similiar with Struct.

      I’m confused about how to forming such an input parameter in GUI???
      thanks

      your reply will be appreciated and helpful.

    9. Izzy - May 22, 2009

      oh,some infos are missing.they were deleted automatically.

      would you mind telling me your email?
      since i really have some confusions about using this.
      is that ok?

    10. Shaun - May 22, 2009

      Excellent routine! I’m having a problem using this class however. When I call “return results.CompiledAssembly;” I get the following exception:

      Execution permission cannot be acquired.
      Description: An unhandled exception occurred during the execution of the current web request. Please review the stack trace for more information about the error and where it originated in the code.

      Exception Details: System.Security.Policy.PolicyException: Execution permission cannot be acquired.

      Source Error:

      An unhandled exception was generated during the execution of the current web request. Information regarding the origin and location of the exception can be identified using the exception stack trace below.

      Stack Trace:

      [PolicyException: Execution permission cannot be acquired.]
      System.Security.SecurityManager.ResolvePolicy(Evidence evidence, PermissionSet reqdPset, PermissionSet optPset, PermissionSet denyPset, PermissionSet& denied, Boolean checkExecutionPermission) +10236136
      System.Security.SecurityManager.ResolvePolicy(Evidence evidence, PermissionSet reqdPset, PermissionSet optPset, PermissionSet denyPset, PermissionSet& denied, Int32& securitySpecialFlags, Boolean checkExecutionPermission) +97

      [FileLoadException: Could not load file or assembly 'm2wivo6v, Version=0.0.0.0, Culture=neutral, PublicKeyToken=null' or one of its dependencies. Failed to grant permission to execute. (Exception from HRESULT: 0x80131418)]
      System.Reflection.Assembly._nLoad(AssemblyName fileName, String codeBase, Evidence assemblySecurity, Assembly locationHint, StackCrawlMark& stackMark, Boolean throwOnFileNotFound, Boolean forIntrospection) +0
      System.Reflection.Assembly.InternalLoad(AssemblyName assemblyRef, Evidence assemblySecurity, StackCrawlMark& stackMark, Boolean forIntrospection) +416
      System.Reflection.Assembly.Load(AssemblyName assemblyRef, Evidence assemblySecurity) +33
      System.CodeDom.Compiler.CompilerResults.get_CompiledAssembly() +105…

      I’m running this code in SharePoint 2007 on Windows Server 2008.

    11. vikram - May 26, 2009

      It’s working fine but application memory increases when web service call are made 2500 times.

      Can we delete the temporary files created while compiling assembly ?

    12. marmri - May 31, 2009

      Hi,
      Thank you for this great example.
      I have the same problem as Sergio - May 14, 2009
      Did you wirte him any suggestion? Please forward it or add it in this article for the whole aucience!
      I have another question: how to do, if you have following situation:

      MyWebReference.GoodbyeWorldWSService myProxy = new MyWebReference.GoodbyeWorldWSService();
      MyWebReference.sayGoodbye request = new MyWebReference.sayGoodbye();
      request.message = “ciao”;
      myProxy.sayGoodbye(request);

      I mean, you have like an object as parameter you first initialize then invoke the service method!

      Please help, is urgent. Thanx a lot in advance

    13. Jeff - June 13, 2009

      Hi As I walk on the code.. i see that the reason why its throwing an exception on this line (T)type.InvokeMember(methodName, BindingFlags.InvokeMethod, null, obj, args); it is maybe because you are calling a method with complex (custom) type and not a generic type. try to have a breakpoint on that line and see the details of the “type” variable.

    14. shail - June 27, 2009

      I am using your example. But its giving me an error on InvokeMember that “The request failed with HTTP status 401: Access Denied” Is there anything special, i will have to do here?

      Thanks,

      Shail …

    15. RadoColo - June 30, 2009

      Beautiful, works like a charm!

    16. usmanbinasif - July 6, 2009

      Dear it is awesome code example of this problem domain, and it is very helpful for me.

      Thanks for sharing such a wonderful peice of code.

      Regards,
      Usman Javed

    17. newbieDotNET - July 7, 2009

      Will it be possible to invoke or set the timeout property? Any help would be greatly appreciated.

      Thanks,
      Jon

    18. David Roys - July 8, 2009

      What an awesome example. Well explained and a great download! Thank you for your time and effort. Unfortunately it doesn’t quite work for me.

      I am also having the problem with authentication that shail posted. I know that when I use my web service by generating the proxy class, I need to use the line:

      ws.UseDefaultCredentials = true in order to be able to user the service.

      I am getting the following error:

      Unable To Load Service: The remote server returned an error: (401) Unauthorized.

      when I click the Load Service button and I can only assume it is because the XMLTextReader is not negotiating my credentials. If I use Internet explorer to hit the URL it will give me the WSDL but I believe this is because it handles the challenge response correctly. Do I need to use another method of getting my WSDL - i.e. not using XMLTextReader?

      Thanks again for such a great post! I learnt a lot.

    19. Mark - July 8, 2009

      Good work, excellent explanation.

      functions that expect strings do work, but functions that expect other types (int, byte[], …) do not work.

      Any idea how to solve this?

      Thanks

      Mark

    20. David Roys - July 10, 2009

      Hi there, OK, I thought I would let other readers know that I managed to sort out my problems with authentication.

      You can read the details on a blog post I made http://www.teachmenav.com/blogs/dave/archive/2009/07/11/using-reflection-to-call-nav-2009-web-services.aspx

      Thanks again for the great post.

    21. Crows Programming » I’m Back - July 15, 2009

      [...] Hey guys, sorry I’ve been away for a bit. I’ll try and respond to your questions, especially those over on the C# dynamic web service page. [...]

    22. MaTZ - July 22, 2009

      Hi,
      I have a problem with http authentication.
      I managed to download WSDL by modifying BuildAssemblyFromWSDL like this:

      System.Net.WebClient client = new System.Net.WebClient();

      if (login.Length > 0)
      {
      client.Credentials = new NetworkCredential(login, password);
      }

      System.IO.Stream stream = client.OpenRead(webServiceUri.ToString() + “?wsdl”);

      XmlTextReader xmlreader = new XmlTextReader(stream);

      ServiceDescriptionImporter descriptionImporter = BuildServiceDescriptionImporter(xmlreader);

      return CompileAssembly(descriptionImporter);

      Now I’m getting exception (error 401) later when I try to invoke web method. Any ideas?

      Thanks for the post.

    23. facebook proxy - July 25, 2009

      Interesting article. Were did you got all the information from… :)

    24. proxies - July 25, 2009

      You are a very smart person! :)

    25. Andrew Brown - August 4, 2009

      Very useful post. I have been using this technique for over a year.

      I am having a problem where the web service request takes longer than 110 seconds to return a response. This causes a timeout error. I have been troubleshooting the timeout issue by changing all configurable timeout settings from the application setting (web.config) and IIS.

      [Error Details]
      System.Reflection.TargetInvocationException: Exception has been thrown by the target of an invocation. —> System.Net.WebException: The operation has timed out.

      I setup a simple test where the web server thread sleeps for 2 mins and 30 seconds.

      Please post if anyone has solved this.

    26. Donald Drake - August 5, 2009

      ““Method ‘Service1.Sum’ not found” ”

      I was able to fix this error by using the following instead.

      MethodInfo method = type.GetMethod(methodName);
      return (T) method.Invoke(instance, args);

      I believe the issue is due to the fact that it is using BindingFlags.InvokeMethod.. I was not able to use any other bindingflag with the type.InvokeMember method.

      Hope this helps.

      Thanks,
      Don

    27. Andrew Brown - August 5, 2009

      I found a solution to the Timeout issue. I had to set the Timeout property of the proxy instance.

      [CODE]
      PropertyInfo propInfo = obj.GetType().GetProperty(”Timeout”);
      propInfo.SetValue(obj, 300000 /* set this to whatever timeout period you want */, null);

      Then invoke the method.

    Posted by tornado
    |
    출처 : http://blogs.technet.com/kruc/archive/2009/06/02/oc-tab.aspx


    OC 대화창 옆에 TAB 붙이는 방법

    Context Windows in Communicator Using UCMA v2.0

    Office Communicator has a number of useful but mostly unknown features. One of these is its ability to display a custom context pane in a conversation window. The context pane shows up where the video goes in a video chat, and displays HTML content from any intranet or trusted URL.Conversation window with context pane

    The way to trigger this window is to send a SIP INFO message with a particular type of XML document to the conversation. All of the remote participants that receive the message will then get the context pane in Communicator if they are configured appropriately.

    Notice the catch: there are a couple of things that need to be configured on each client in order for the context pane to show up.

    First, a registry setting needs to be set to enable the context pane functionality in Communicator. To do this, open up regedit.exe and navigate to:

    HKEY_LOCAL_MACHINE\SOFTWARE\Policies\Microsoft\Communicator

    You may have to create some of those folders if they don’t already exist. Just right-click on the level above it and select New Key.

    Once you’ve found the right key, create a DWORD (32-bit) value called EnableConversationWindowTabs, with a value of 1.

    Regedit with EnableConversationWindowTabs setting

    So much for registry settings. Next, if the URL you want to use for the content of your context window is not on your local intranet, you will need to add it to your trusted sites. You can do this through Internet Options in Internet Explorer.

    Internet Options Security tab in Internet ExplorerTrusted Sites in Internet Explorer

    Once everything is configured properly, you’ll be able to see the context window when your OCS endpoint receives a SIP INFO message with “call associated data” information.

    The code to send this message through UCMA v2.0 is actually quite simple. You will need the format of the XML document, as well as the content type; I like to keep these in constants so the code stays clean.

    Here is the text of the XML document. (The {0} in the XML block represents a unique ID for each context pane, and the {1} represents the URL of the content.)

    private const string CONTEXT_WINDOW_MESSAGE = "<associatedData xmlns=\"http://" + 
    "schemas.microsoft.com/LCS/2007/04/CallAssociatedData\" xmlns:xsi=\"http://" +
    "www.w3.org/2001/XMLSchema-instance\" xsi:schemaLocation=\"http://" +
    "schemas.microsoft.com/LCS/2007/04/CallAssociatedData\">" +
    "<associatedDataElement id=\"{0}\" purpose=\"CWurl\">" +
    "<urlToHost>{1}</urlToHost><closeWithWindow>false</closeWithWindow>" +
    "</associatedDataElement></associatedData>";

    Here is the content type:

    private const string CONTEXT_WINDOW_CONTENT_TYPE = "application/ms-call-associated-data+xml";

    An integer instance variable will help keep track of the next unique ID in the sequence.

    private int _contextWindowId = 1;

    Before you can send the INFO message, you will already have had to set up a CollaborationPlatform, endpoint, conversation, and call. If you need help with the steps, you should be able to find detailed instructions in the UCMA v2.0 SDK documentation, or you can look at some of the samples that come packaged with the SDK.

    In order to send the INFO message, we need to call the BeginSendInfo method on an established call. The BeginSendInfo method takes a byte array for the content of the INFO message, so the next step is to encode the XML document as a byte array:

     byte[] bytes = Encoding.UTF8.GetBytes(string.Format(CONTEXT_WINDOW_MESSAGE, 
    _contextWindowId++, _url));

    Notice that I’m plugging the context window ID and the content URL into the XML document, and also incrementing the context window ID.

    Finally, we call BeginSendInfo on the Call object, passing in the content type, the byte array, and a callback delegate. If everything is set up correctly, the remote participant(s) in the call will see the context pane appear in their conversation windows.

    infoMessageCall.BeginSendInfo(
    new System.Net.Mime.ContentType(CONTEXT_WINDOW_CONTENT_TYPE), bytes, null,
    asyncResult => infoMessageCall.EndSendInfo(asyncResult), null
    );

    If a configuration problem is preventing the context window from working properly, you should see an error message in the conversation window that says “Could not display a form related to this conversation, which may prevent access to some options. If this problem persists, contact your system administrator.” If you are getting this message, check the registry setting again, and make sure that the URL you are using is a trusted site. You can also try looking at the properties of the SipResponseData object that is returned by the EndSendInfo method; this may give you a clue to the problem.

    Note that you are perfectly free to pass in a query string parameter in the URL you send. You can do some really cool contextual things by linking to server-side applications that display data dynamically based on the parameters passed in with the URL.

    Here is the complete code of my ContextWindowMessage class:

    /// <summary>

    /// Handles the sending of the INFO message that causes the extended window 
    /// to appear in Communicator.
    /// </summary>
    public class ContextWindowMessage {
     
        #region Constants
     
        private const string CONTEXT_WINDOW_MESSAGE = "<associatedData xmlns=\"http://" +
            "schemas.microsoft.com/LCS/2007/04/CallAssociatedData\" xmlns:xsi=\"http://" +
            "www.w3.org/2001/XMLSchema-instance\" xsi:schemaLocation=\"http://" +
            "schemas.microsoft.com/LCS/2007/04/CallAssociatedData\">" +
            "<associatedDataElement id=\"{0}\" purpose=\"CWurl\">" +
            "<urlToHost>{1}</urlToHost><closeWithWindow>false</closeWithWindow>" +
            "</associatedDataElement></associatedData>";
        private const string CONTEXT_WINDOW_CONTENT_TYPE = 
            "application/ms-call-associated-data+xml";
     
        #endregion
     
        private int _contextWindowId = 1;
        private string _url = string.Empty;
     
        public ContextWindowMessage(string url) {
            if (string.IsNullOrEmpty(url)) {
                throw new ArgumentException("URL cannot be null.");
            }
     
            _url = url;
        }
     
        /// <summary>
        /// Sends the INFO message with the URL for the extended window.
        /// </summary>
        /// <param name="infoMessageCall">The call in which to send the INFO message.</param>
        public void SendToCall(Call infoMessageCall) {
     
            // We need to supply the INFO message as a byte array. The message itself is an 
            // XML document, whose format is in the CONTEXT_WINDOW_MESSAGE constant.
     
            byte[] bytes = Encoding.UTF8.GetBytes(string.Format(CONTEXT_WINDOW_MESSAGE, 
                _contextWindowId++, _url));
     
            // To send the INFO message, we use the BeginSendInfo method on the Call 
            // (not the Flow). In order for the extended window to appear, the first
            // parameter (the content type) should be "application/ms-call-associated-data+xml".
     
            infoMessageCall.BeginSendInfo(
                new System.Net.Mime.ContentType(CONTEXT_WINDOW_CONTENT_TYPE), bytes, null, 
                asyncResult => infoMessageCall.EndSendInfo(asyncResult), null
            );
        }
    }
    Posted by tornado
    |

    AD 설치 PC --> Active Directory 사용자 및 컴퓨터 --> 도메인 선택
    --> Computers 선택 --> 원격 접근할 PC 선택 후 관리 선택 --> 로컬 사용자 및 그룹 --> 그룹 --> 허용할 도메인 User 추가.

    Posted by tornado
    |
    북마크가 없어져서... 블로그에 남김.


    Microsoft Office Communications Server 2007 R2
    Adding Commands to the Communicator 2007 R2 Menus

    You can add custom commands to various Communicator menus, and pass the SIP URI of the current user, and selected contacts, to the application launched by your custom command.

    The custom commands that you define appear on the following menus:

    • The Tools menu.
    • The Actions menu off the Conversation window.
    • The right-click menu off the Contact List.

    See the "Accessing a Custom Command" section, later in this topic.

    You can define custom commands for two types of applications:

    • Applications that apply only to the current user and are launched on the local computer.
    • Applications that involve additional users, such as an online collaboration program, and must be launched on each user's computer.

    When the application you want to integrate involves other users, the custom command can be invoked by:

    • Selecting one or more users, and then choosing the custom command.
    • Starting a two-party or multi-party conversation, and then choosing the custom command.

    For a detailed example, see Integrating a Third-Party Collaboration Program with Communicator in the Client Technical Reference documentation.

    Use the registry settings in the table below to add a command to the Office Communicator menus. These entries are placed in the registry at HKEY_LOCAL_MACHINE\Software\Microsoft\Communicator\SessionManager\Apps\[GUID of Application].

    Custom command registry entries

    Name Type Data

    Name

    REG_SZ

    Name of the application as it appears on the menu.

    ApplicationType

    DWORD

    0 = Executable (default)

    Dd819982.note(en-us,office.13).gif Note:
    Requires ApplicationInstallPath.

    1 = Protocol

    ApplicationInstallPath

    REG_SZ

    Full path of the executable.

    Dd819982.note(en-us,office.13).gif Note:
    Must be specified if ApplicationType is 0 (Executable).

    Path

    REG_SZ

    Full path to be launched along with any parameters, including the default parameter of %user-id% and %contact-id%.

    SessionType

    DWORD

    0 = Local session. The application is launched on the local computer.

    1 = Two-party session (default). Communicator 2007 R2 launches the application locally, and then sends a desktop alert to the other user. The other user clicks the alert and starts the specified application on their computer.

    2 = Multi-party session. Communicator 2007 R2 launches the application locally, and then sends desktop alerts to the other users, prompting them to launch the specified application on their own computer.

    ExtensibleMenu

    REG_SZ

    A list of the menus where this command will appear, separated by semi-colons. Possible values are:

    MainWindowActions MainWindowRightClick ConversationWindowActions ConversationWindowContextual ConversationWindowRightClick

    If ExtensibleMenu is not defined, the default values of MainWindowRightClick and ConversationWindowContextual are used.

    For example, executing the following Registry Editor (.REG) file results in the addition of the Contoso Sales Contact Manager menu item to the Actions menu.

    Windows Registry Editor Version 5.00
    
    [HKEY_LOCAL_MACHINE\Software\Microsoft\Communicator\SessionManager\Apps\{1F9F07C6-7E0B-462B-AAD7-98C6DBEA8F69}]
    "Name"="Contoso Sales Contact Manager"
    "HelpMessage"="The Contoso Sales Contact Manager is not installed. Contact the Help Desk for more information."
    "ApplicationType"="REG_DWORD:00000000"
    "ApplicationInstallPath"="C:\\cltest.exe"
    "Path"="C:\\cltest.exe %user-id% %contact-id%"
    "SessionType"="REG_DWORD:00000001"
    "ExtensibleMenu"="ConversationWindowActions;MainWindowRightClick"
    To access a custom command after it is added
    • Do one of the following, depending on the ExtensibleMenu values you define:

      • MainWindowActions: On the Office Communicator Title bar, click the down arrow, point to Tools, and then click your custom command.
      • MainWindowRightClick: Right-click a contact in the Contact List or Search Results pane, and then click your custom command.
      • ConversationWindowActions: In the Conversation window Title bar, click the Menu button, point to Actions, and then click your custom command.
      • ConversationWindowContextual: In the Conversation window, click the contextual actions drop-down arrow in the top right corner, below the Title bar, and then click your custom command.
      • ConversationWindowRightClick: In the Conversation window Participant List, right-click a contact name, and then click your custom command.
    Tags What's this?: Add a tag
    Community Content   What is Community Content?
    Add new content RSS  Annotations
    %contact-id% parameter is not functional in R2      javerlin   |   Edit   |   Show History
    Even though documented under "path" and shown in the example, the %contact-id% parameter is not functional in R2. It is not replaced by the actual contact value but is literally passed as "%contact-id%". The %user-id% parameter is functional.

    This lack of functionality rendors nearly useless any menu selections when right clicking on a contact since the contact information is not passed to the application.

    It would be very valuable to know if this has been intentionally removed for R2 or if it is a bug.
    Posted by tornado
    |